

Most GitHub profile READMEs are a waving-hand emoji followed by a wall of badges. They look busy and say nothing, because they were copied from someone whose goal was different from yours.
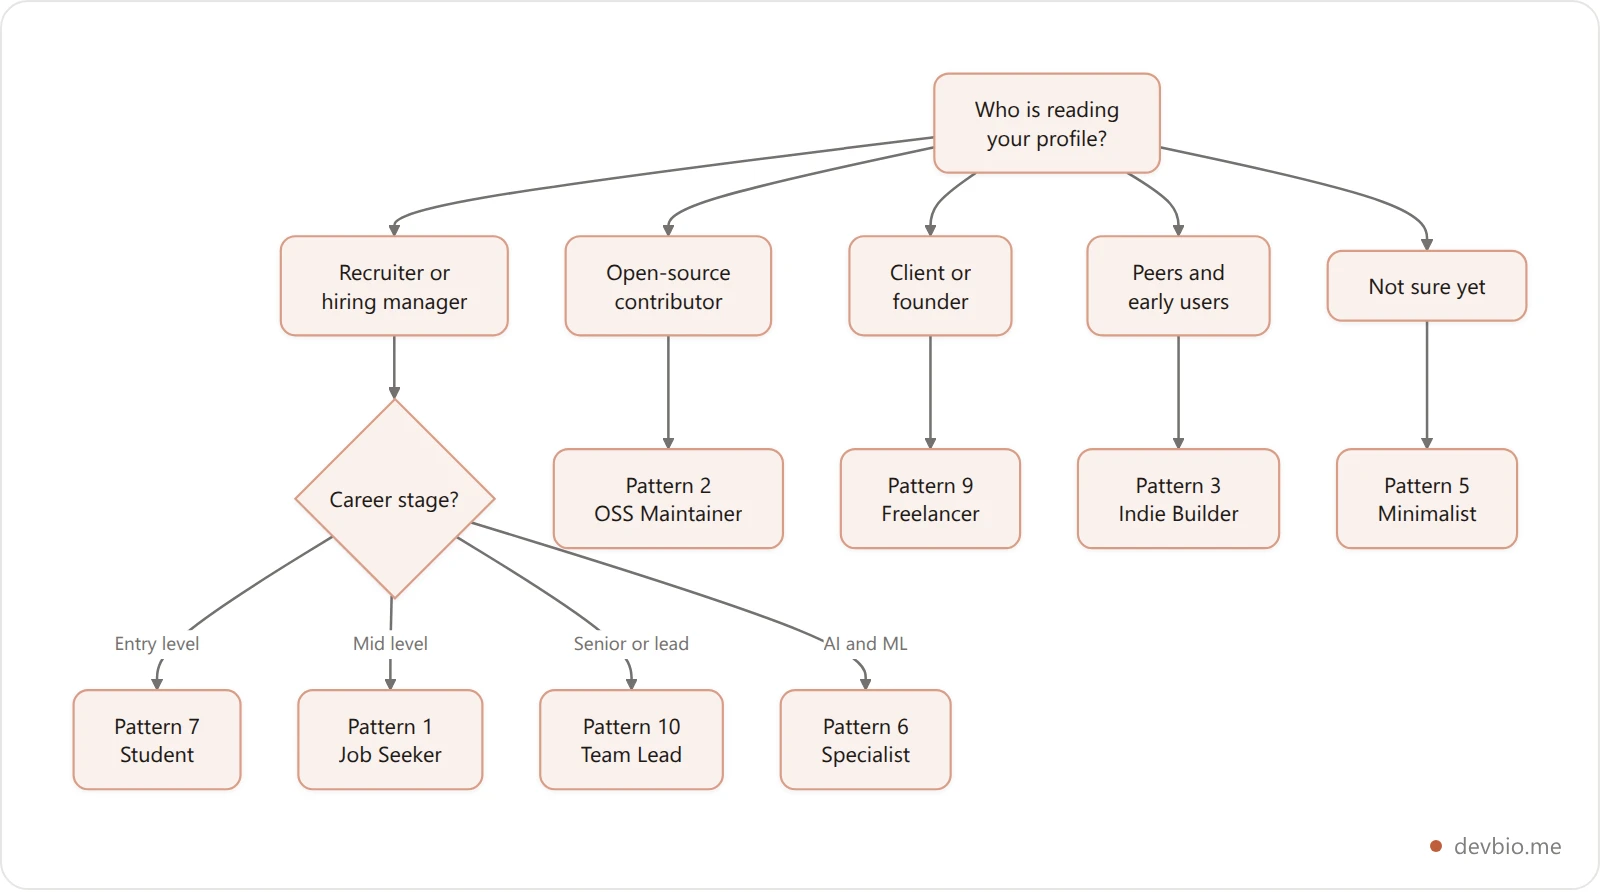
The direct answer: Pick one of ten patterns based on who you're trying to reach — recruiter, contributor, client, or co-founder — then lead with your single strongest signal. Each template below is copyable markdown with the fill-in parts in brackets, and each one names what it structurally can't show.
Table of Contents#
What a Profile README Is (and Why Most Miss the Point)#
GitHub has 180 million developers, and choosing the right GitHub profile README templates for your goal is the decision most of them skip. The github-readme-stats widget has 79.7k stars — proof of how many developers want their profile to stand out. What that number doesn't show is how many copy a template that looks cool and wonder why nothing comes of it.
A profile README has one job: communicate the right signal to the right audience in under 10 seconds. Which template is right for you depends entirely on who you're trying to reach — a recruiter, a contributor, a client, or a future co-founder.
Where the File Actually Lives#
A GitHub profile README is a markdown file in a special repository named exactly after your username. It renders at the top of your GitHub profile page, above your pinned repos. GitHub added this feature in 2020. Since then, the question "what should I put in mine?" has become one of the most-searched GitHub topics — because the default is a commented-out template that almost nobody improves.
Below are 10 patterns, each matched to a specific goal. Every pattern comes with copyable markdown, the elements that make it work, and what it structurally can't show — some problems are bigger than a README. If you only want one, the best GitHub profile README template is simply the one whose audience matches yours.
Before You Pick: The 3-Question Framework#
Answer these before copying any template:
Who is reading this? Recruiter, open-source contributor, client, or potential co-founder?
What do I want them to do? Hire me, open a PR, book a call, or follow my build?
What is my single strongest signal? Years of experience, starred repos, shipped revenue, or something else?
Your README should lead with the answer to #3, filtered through the lens of #1. If you can't answer all three, your README will try to say everything and communicate nothing. GitHub has 180 million profiles — you can't speak to all of them at once.
If you'd rather not squeeze your GitHub activity, work history, and revenue proof into one markdown file at all, build one profile that shows all of it together.
The 10 GitHub Profile README Templates#
Pattern 1: The Job Seeker#
Goal: Get shortlisted for engineering roles before the recruiter opens your resume.
Recruiters at technical companies treat GitHub as a pre-screen. The 2025 GitHub Octoverse shows 36.2 million new developers joined in a single year — one per second. Standing out in that pool means making your intent and capability obvious in the first scroll. SHRM's 2025 Talent Trends report found 69% of organizations struggle to fill technical positions — which means recruiters are actively scanning for candidates, not waiting for applications.
Key elements:
Your title, primary stack, and years of experience in the header
A one-line "open to" statement with role type and location preference
2–3 pinned repos with star counts and a single-sentence description each
One direct CTA: email, LinkedIn, or a link to your resume or dev bio
Template:
# [Your Name] · [Role Title]

[Stack] · [X] years building [type of systems]

📌 Open to [role type] roles ([remote/hybrid/on-site])

**Currently:**
- Building [project] — [one sentence on what it does]
- Available from [month]

**Shipped:** [repo-1] · ★[N]k | [repo-2] · used by [N] teams

📬 [email] · [LinkedIn URL] · [devbio.me/yourname]
What it can't show: 81.5% of GitHub contributions happen in private repositories (Octoverse 2025). This pattern only surfaces public work. For a job search, a developer profile built for hiring that includes your full work history fills that gap.
Pattern 2: The OSS Maintainer#
Goal: Signal credibility to contributors, attract sponsors, and convert users into community members.
If you maintain a popular repository, your profile is the first thing potential contributors check before they look at your code. The signal here is stewardship, not personal branding. One founder documented on Indie Hackers how consistent public proof of project activity was the turning point from zero to five-figure MRR — your README is the most visible piece of that proof.
Key elements:
Active projects listed with star counts and one-sentence descriptions
A GitHub stats widget or contribution graph embed
A sponsorship CTA (GitHub Sponsors, Polar, Open Collective)
Community links: Discord, issue tracker, mailing list
Template:
# [Name] — Open Source Maintainer

**Active projects:**
- 🔧 [project-name] · ★[N]k — [what it does in one sentence]
- 🔧 [project-name] · ★[N]k — [what it does in one sentence]

[GitHub Stats Widget]

**Support the work:**
→ [GitHub Sponsors URL]
→ [Polar or Open Collective URL]

💬 [Discord] · 📢 [Newsletter] · 🐛 Issues welcome
What it can't show: Contribution graphs count only public commits. If you're also building a commercial layer on top of your open source work — a SaaS, a managed service, a paid tier — Polar or Stripe MRR won't appear on your GitHub profile. A dedicated developer bio handles the revenue proof side.
Pattern 3: The Indie Builder#
Goal: Attract early users, newsletter subscribers, and potential co-founders by showing you ship consistently.
The indie hacker community runs on proof of shipping. Your README is the first surface of that proof, and it updates on your schedule. The key is showing momentum — a current project with real traction — not a static list of old side projects from two years ago.
Key elements:
Your current project with a live link and a one-sentence value prop
A "recent ships" section you actually update (monthly is enough)
Revenue or user traction if you're sharing publicly
Where people can follow your build log
Template:
# [Name] — Builder / Indie Hacker

**Currently building:** [Project Name] — [what it does in one sentence]
→ [Live URL]

**Recent ships:**
- [Feature or launch] — [date]
- [Feature or launch] — [date]

**Traction:** [N users] · [$N MRR] · [N stars]

📰 Follow the build: [X/Twitter] · [newsletter] · [devbio.me/yourname]
What it can't show: MRR and subscriber counts in a README go stale the moment you push the file. Connecting your payment gateway (Stripe, Dodo Payments, Lemon Squeezy, or Polar) to a developer bio keeps those numbers live automatically — no manual commit every time revenue moves. The building in public developer guide covers the full setup for this approach.
Pattern 4: The Full-Stack Generalist#
Goal: Show a practical, broad skill set to employers and clients who need someone who can own the whole stack.
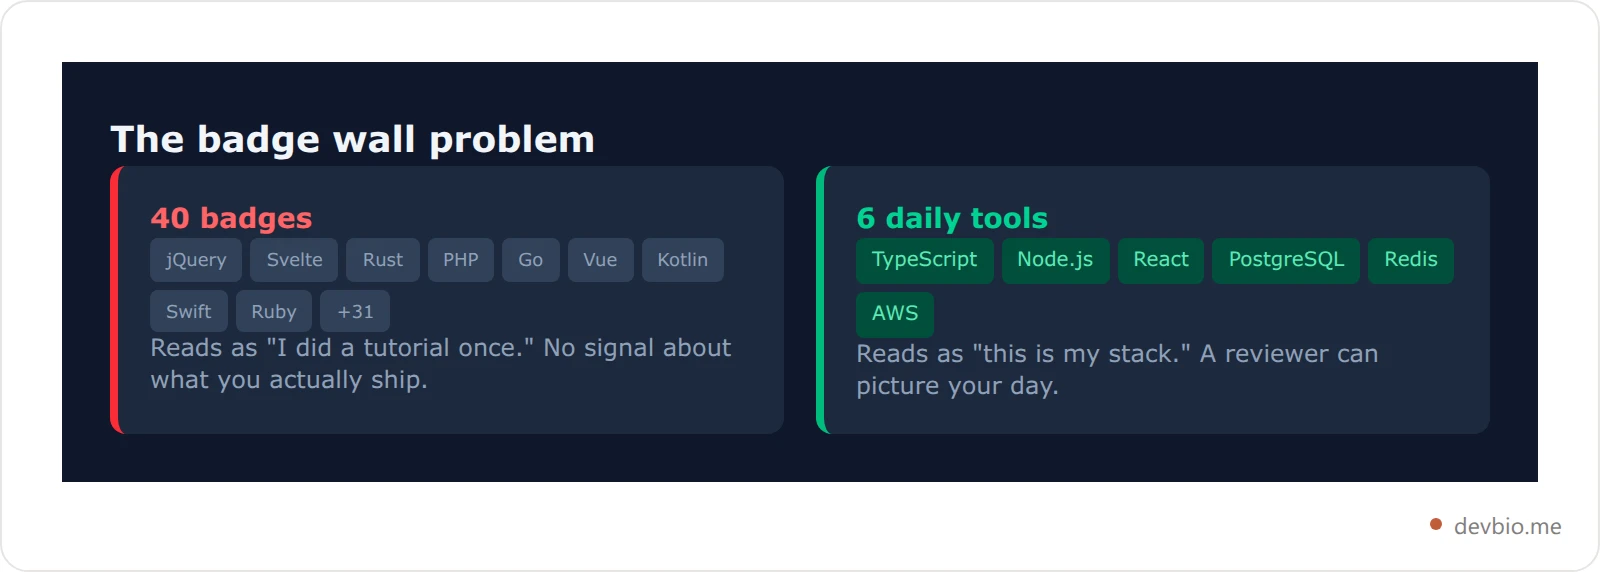
This is the most common README pattern — and the most commonly over-done. Walls of shields.io badges for every framework you've touched in a tutorial are the number-one mistake. Recruiters want signal, not noise. A focused list of 6 technologies you use every day is more credible than 40 badges covering everything you've ever installed.
Key elements:
5–8 technologies you use daily (not your complete list)
A live GitHub stats card and a top languages card
2–3 pinned repos that demonstrate breadth, not just depth
No more than 8 badge icons — pick the ones that match your target role
Template:
# [Name] · Full-Stack Engineer

**Daily stack:** TypeScript · Node.js · React · PostgreSQL · [1–2 more]

[GitHub Stats Widget — dark theme recommended]

[Top Languages Widget — compact layout]

**Selected work:**
| Project | Stack | Type |
|---------|-------|------|
| [repo-1] | TS / Node / PG | SaaS |
| [repo-2] | React / GraphQL | OSS |
What it can't show: The stats widget counts only public repositories. If most of your work is in private repos — which Octoverse 2025 confirms is true for the majority of developers — the numbers underrepresent your actual output. See what GitHub README stats actually show and miss for a full breakdown.
Pattern 5: The Minimalist#
Goal: Make one confident, memorable impression. Common among senior engineers who prefer their work to speak for itself.
The minimalist pattern is editorial discipline, not laziness. A profile that says three things clearly beats one that says twenty things vaguely. The risk is being so minimal you communicate nothing — so every word that stays has to earn its place. This pattern only works when your pinned repos are genuinely strong on their own.
Key elements:
Your name and a single-sentence tagline (what you build, for whom)
One or two current or notable projects with links
One contact method, nothing more
Template:
# [Name]

[One sentence: who you are and what you build]

Currently: [Project Name] · [URL]
Previously: [Notable company or project]

→ [email or preferred contact link]
What it can't show: Almost no context about work history, stack, or contribution activity. Works best when pinned repos are genuinely impressive on their own, or when you have a linked personal site that carries the full story. Start a profile that carries that story for you if you don't already have one.
Pattern 6: The AI/ML Specialist#
Goal: Signal deep technical credibility to research teams, AI startups, and engineering hiring managers who can actually evaluate your work.
The 2025 Stack Overflow Developer Survey found Python adoption increased 7 percentage points year-over-year, driven by AI and data science workloads. The AI/ML hiring market is competitive — generic "I use PyTorch" claims don't differentiate. Specific contributions do: a named model on HuggingFace, a benchmark result, a paper with a DOI.
Key elements:
Specific models, datasets, or papers you've contributed to — with direct links
arXiv, HuggingFace, or research platform profiles
Key repos with benchmark results or model cards
Your infrastructure stack, not just framework names
Template:
# [Name] · ML Engineer / Researcher

**Focus:** [domain: NLP / CV / RL / generative models]

**Published / released:**
- [Model or paper name] — [venue or HuggingFace link]
- [Dataset or benchmark] — [link]

**Stack:** Python · PyTorch · [infra: CUDA / Ray / vLLM / etc.]

💻 [GitHub] · 🤗 [HuggingFace] · 📄 [arXiv / Google Scholar]
What it can't show: Papers and model releases don't tell a recruiter you can ship production ML systems. If you've deployed models at scale, a work experience section on a linked developer profile makes that transition clear — research chops plus production scars is a rare combination worth calling out.
Pattern 7: The Student / Entry-Level Dev#
Goal: Overcome the "no experience" problem by demonstrating learning velocity and real initiative.
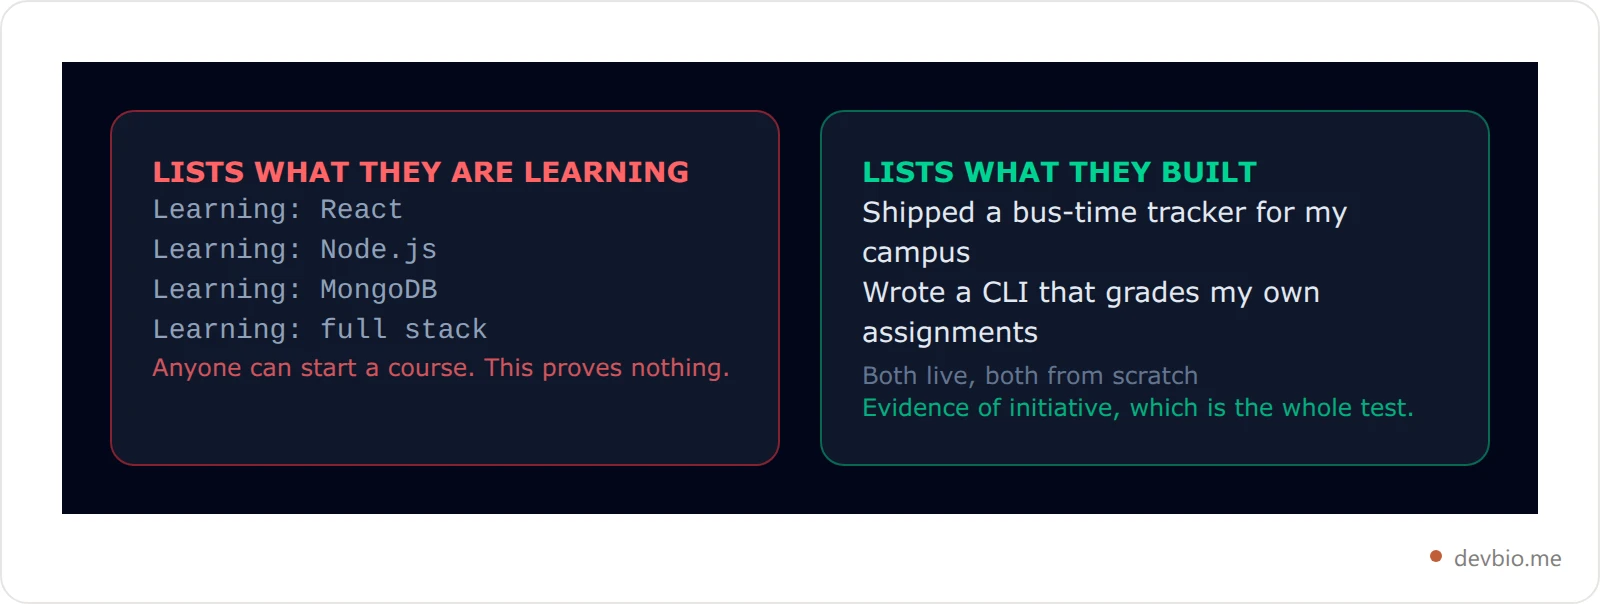
The weakest student READMEs list what someone is learning. The strongest list what they've built. Hiring managers evaluating entry-level candidates know applicants lack years of experience — they're looking for evidence of initiative: did you build a real thing from scratch, or did you follow a tutorial and push the code?
Key elements:
2–3 projects built from scratch (even small ones count if they're genuine)
What you're actively learning — specific, not "everything"
A short-term goal that shows direction and commitment
An explicit availability statement so hiring managers know you're looking
Template:
# [Name] · CS Student / Self-Taught Developer

**Built:**
- [Project 1] — [what it does in one sentence] · [link]
- [Project 2] — [what it does in one sentence] · [link]

**Currently learning:** [specific technology or concept — not "full stack"]
**Goal by [month]:** [specific milestone: ship X, land Y internship]

**Open to:** internships · junior roles · open-source collaboration

📬 [email] · [LinkedIn]
What it can't show: If your public repos are mostly tutorial follow-alongs, anyone who clicks through will see that immediately. This pattern depends on having at least two genuine from-scratch builds that you can point to with confidence.
Pattern 8: The DevRel / Content Creator#
Goal: Show reach and content quality to companies hiring developer advocates, technical writers, or community builders.
DevRel hiring managers look at content output first, code output second. Your README functions as a media kit here, not a code portfolio. The key signal is consistent output over time and a real audience — not one viral post from two years ago.
Key elements:
Latest blog posts or talks (dynamically pulled is ideal; static list works)
Conference appearances or YouTube videos with links
Community or newsletter size with numbers
Social proof: follower count on one or two platforms you're actually active on
Template:
# [Name] · Developer Advocate / Technical Writer

**Latest writing:**
- [Post title] — [publication] · [date]
- [Post title] — [publication] · [date]

**Talks:** [Conference 2025] · "[Topic title]" — [link]

**Audience:**
- [Newsletter name] · [N] subscribers
- [X/Twitter or LinkedIn] · [N] followers

📣 [X/Twitter] · [LinkedIn] · [Personal site or devbio.me/yourname]
What it can't show: A static post list goes stale immediately. There are GitHub Actions that auto-pull your RSS feed into your README, but they require setup and can fail silently. A linked personal site with a live blog feed is more reliable for keeping content current without manual commits.
Pattern 9: The Freelancer / Contractor#
Goal: Generate inbound project inquiries from founders and tech leads who browse GitHub.
Most freelance developers don't optimize their GitHub profile at all — then wonder why they get no inbound from it. Your README can function as a passive lead magnet if you treat it like a brief landing page. The element most freelancers miss: a frictionless CTA that makes it obvious how to hire you, right now.
Key elements:
A clear statement of what you build for clients and for whom
Your tech stack and engagement type (fixed scope vs. ongoing retainer)
2–3 examples of past work with outcomes (anonymize the client if needed)
A direct booking link or email as the last line
Template:
# [Name] · Freelance [Role]

I help [type of client] build [type of product].

**Available for:** [project type] · fixed scope or ongoing retainer
**Stack:** [Your primary stack]

**Recent work:**
- [Client type] — [what you built] — [outcome]
- [Client type] — [what you built] — [outcome]

📅 [Calendly or booking link]
📬 [email]
What it can't show: Availability and past work descriptions go stale fast, and there's no space for testimonials or detailed case studies. For a freelance portfolio that includes live proof of work, see the freelance developer portfolio guide.
Pattern 10: The Team Lead / Senior Engineer#
Goal: Signal leadership, architecture ownership, and multiplier impact — not individual code volume.
Senior engineering READMEs often make the mistake of looking like junior READMEs with bigger stat numbers. A contribution graph showing 800 commits doesn't tell a hiring manager you led a team of eight through a platform migration. Leadership requires a different signal than output frequency.
Key elements:
What teams or domains you've led, with scale or outcome context
Systems or architectures you've owned, with brief outcomes
Mentorship contributions: PRs reviewed, engineers hired or grown
The kind of challenge or organization you want to work on next
Template:
# [Name] · Senior Engineer / Engineering Lead

**Domain:** [platform / infra / product / data / security]

**Led:**
- [Team or product area] — [scale or outcome]
- [Initiative or migration] — [outcome]

**Architected:** [system or platform] — [one sentence on scale or impact]
**Mentored:** [N] engineers · [N] PRs reviewed in 2025

**Looking for:** [type of org, problem space, or stage]

📬 [email] · [LinkedIn] · [devbio.me/yourname]
What it can't show: GitHub contribution graphs measure commit frequency, not leadership scope. An engineering lead who spends their time in design docs, code review, and roadmap planning will look less "active" than a junior who pushes twenty commits a day. A profile with work history and context makes this visible — the contribution graph alone doesn't.
Comparison Table: Which Pattern Fits Your Goal#
All ten GitHub profile README templates side by side, so you can match an audience to a pattern without rereading the sections above.
Pattern | Primary audience | Must-have element | Profile length |
|---|---|---|---|
Job Seeker | Recruiter | Open-to status + pinned repos | Short |
OSS Maintainer | Contributors, sponsors | Project list + sponsor CTA | Medium |
Indie Builder | Early users, co-founders | Current project + traction | Medium |
Full-Stack Generalist | Employer, client | Stats widget + focused stack | Medium |
Minimalist | Anyone | Tagline + 1 project + 1 link | Very short |
AI/ML Specialist | Research teams, AI startups | Papers, models, benchmarks | Medium |
Student / Entry Level | Junior hiring managers | Real projects + direction | Short |
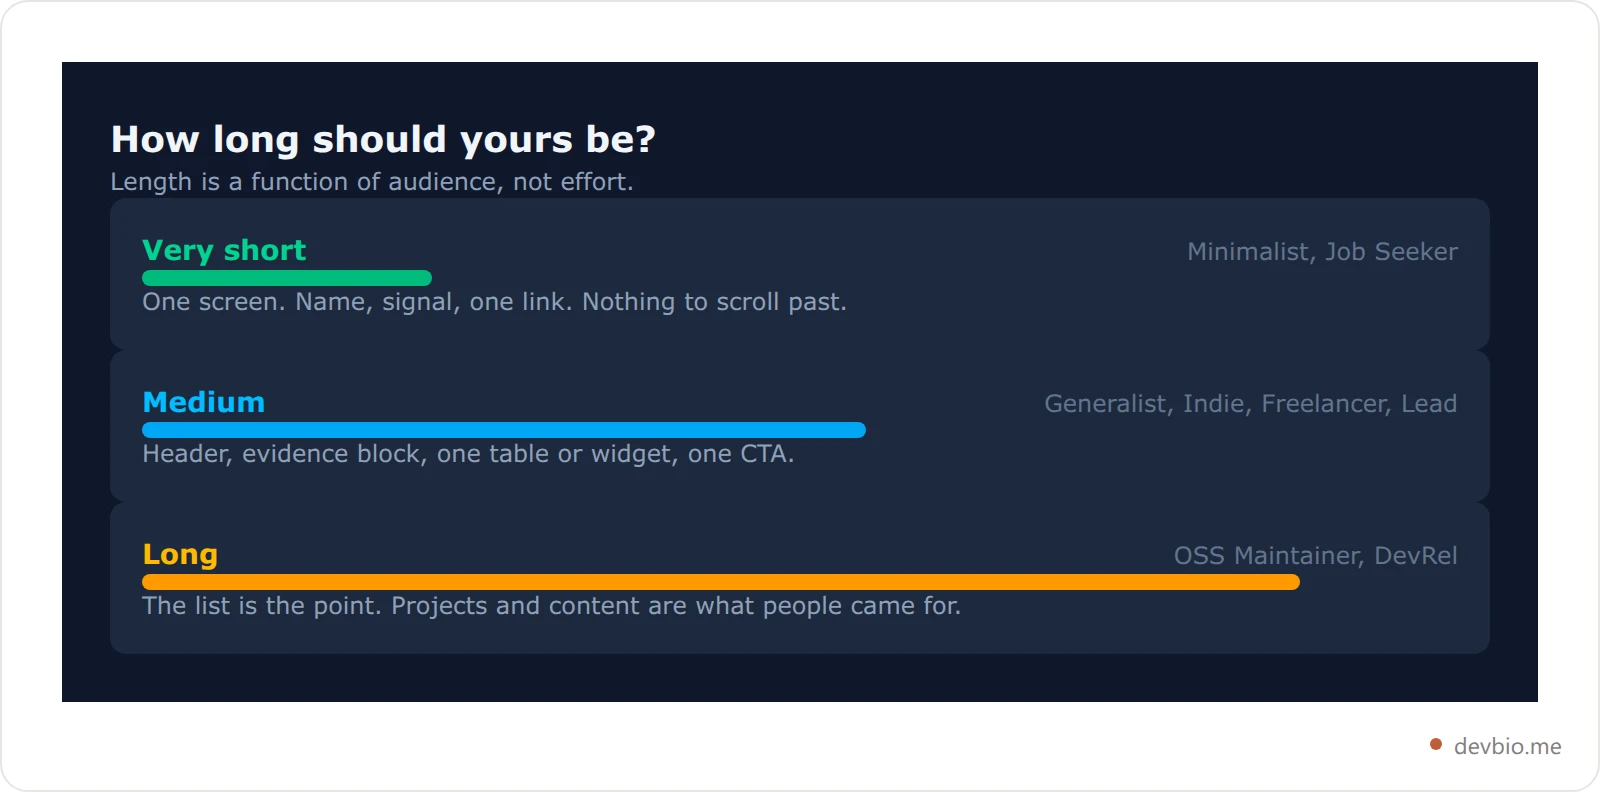
DevRel / Content Creator | DevRel hiring managers | Posts, talks, audience size | Medium–long |
Freelancer / Contractor | Startup founders, tech leads | CTA + outcomes | Medium |
Team Lead / Senior Eng | CTO, VP Engineering | Leadership proof + domain | Medium |
GitHub README Templates vs Profile README Templates#
Searches for GitHub README templates split into two different needs, and the answer is different for each.
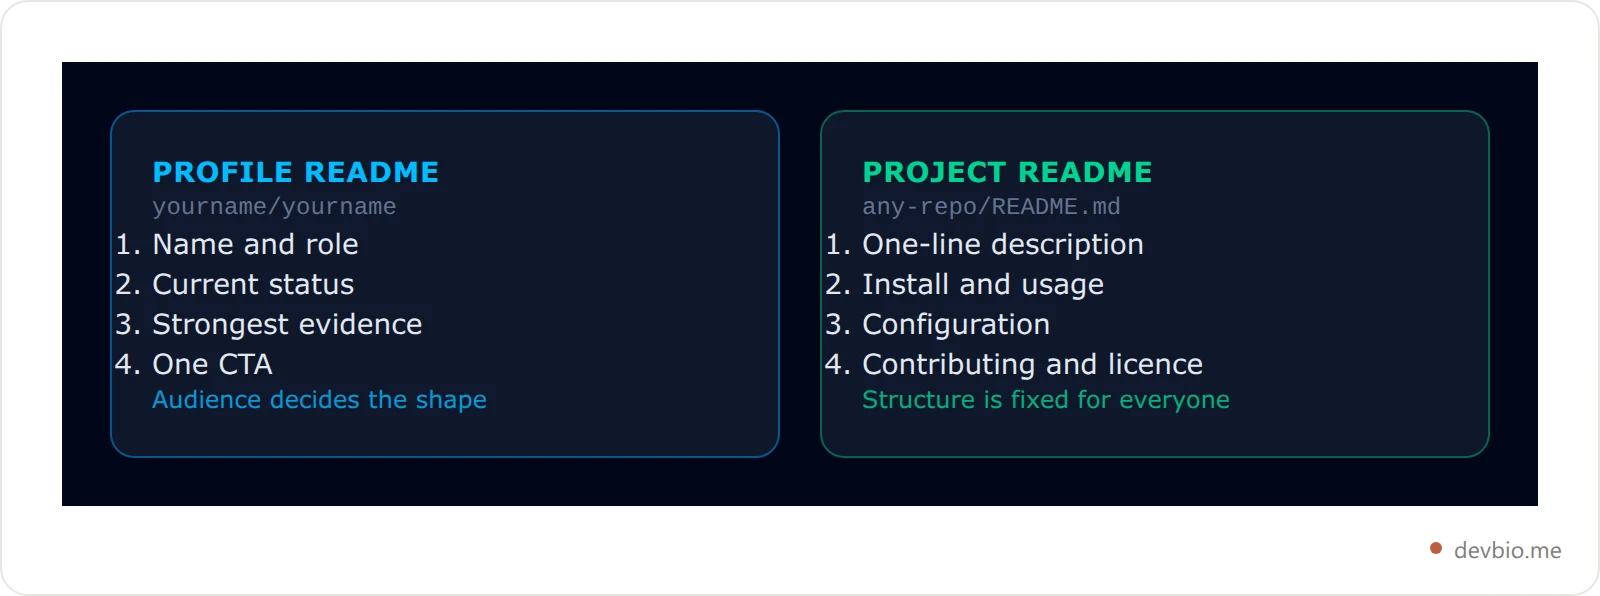
A profile README is the file in yourname/yourname that renders on your profile page — the ten patterns above. A project README is the README.md at the root of a repository, and it has a completely different job: telling a stranger what your code does and how to run it in under thirty seconds. Copying a profile pattern into a project repo is the most common mix-up here, and it reads as noise to someone who just wants the install command.
Profile README | Project README | |
|---|---|---|
Lives in |
| Any repository root |
Audience | Recruiters, contributors, clients | Users evaluating your code |
Opens with | Who you are and your status | What the project does, in one line |
Core sections | Signal, evidence, one CTA | Install, usage, config, licence |
Length | One screen | As long as the setup needs |
Updated | When your goal changes | Every release |
If you landed here wanting project README templates, the structure is fixed rather than audience-dependent: a one-line description, a badge row limited to build status and version, an install block, a minimal working example, then configuration, contributing and licence. There is no need to pick a pattern — a project README that follows that order is already doing its job.
That last stretch of a project README is where collapsible sections earn their place. A long configuration table or a full environment-variable list tucked behind a <details> toggle keeps the page scannable without deleting the reference. It is the single most useful HTML pattern in a project README — and it has exactly one rule that decides whether the Markdown inside it renders at all, covered in the Markdown collapsible section guide.
Profile READMEs rarely need a collapsible section. If your profile is long enough to need a toggle, it is long enough to cut.
The 5-Minute Profile README Checklist#
Run through this before pushing any template:
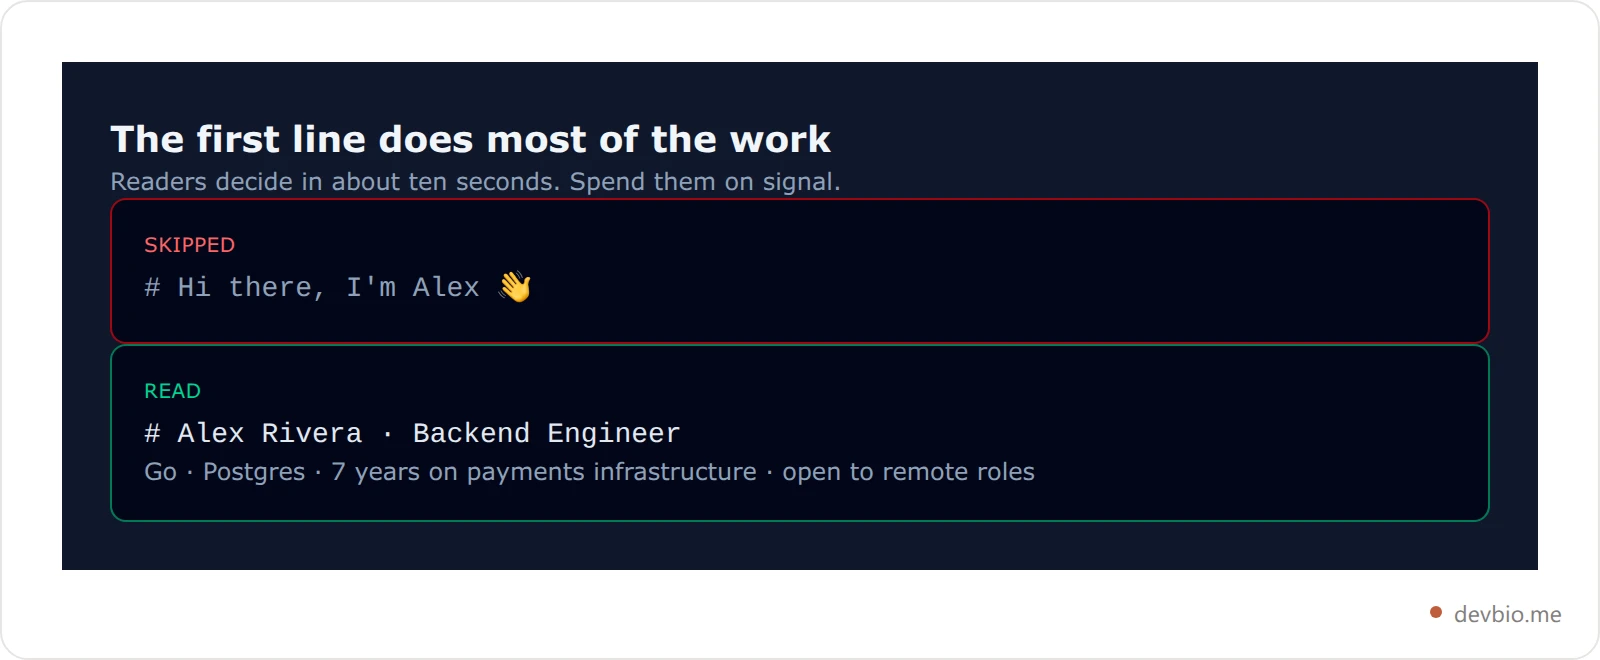
First line: Does it say who you are and what you build — not "Hi, I'm [name] 👋"?
Single audience: Is the content organized for one primary reader, not five?
Links work: Click every URL in preview mode before pushing.
Stats widget renders: Check it in both light and dark mode — GitHub follows system preference.
No stale dates: Remove specific dates you won't update ("Currently learning X since June 2024").
Single CTA: One action you want the reader to take. One link, one email — not five.
Mobile check: Wide tables and side-by-side images break on mobile. GitHub renders your README on every screen size.
What Your README Can't Do (and When to Go Further)#
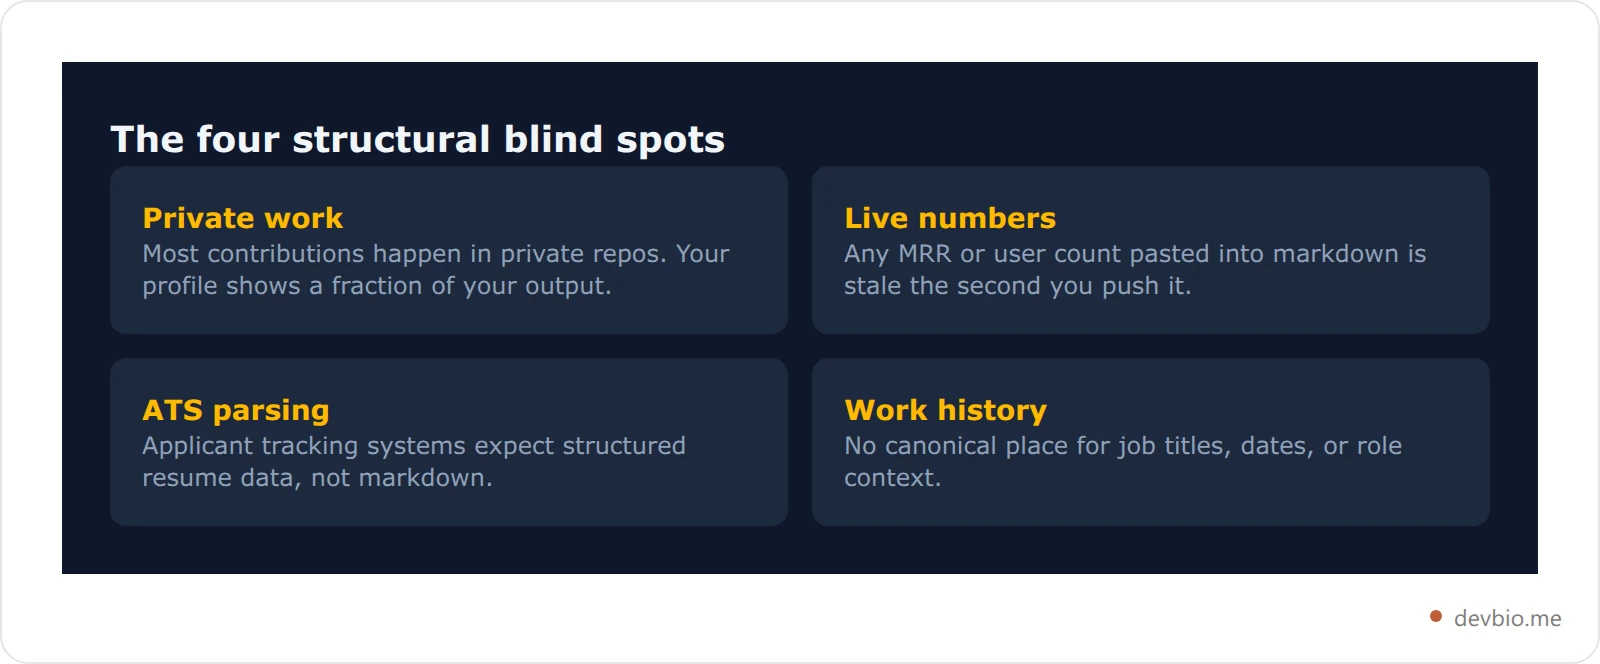
These 10 patterns cover the ceiling of what a GitHub profile README can do well. But there are things the format structurally cannot handle — knowing them helps you decide what goes in the last link of your profile.
A README cannot show:
Private repository work. 81.5% of contributions happen in private repos (GitHub Octoverse 2025). If that's where your best work lives, your profile is showing under 20% of your actual output.
Live revenue or subscriber numbers. Any MRR or user count you paste into a markdown file goes stale the moment you push it.
ATS-parseable structure. Applicant tracking systems don't parse markdown profiles — they expect structured resume data with dates, job titles, and company names.
Work history with context. A README has no canonical place for employment history, project timelines, or role descriptions.
Per-project live data. The stats widgets show aggregate numbers across all public repos, not live stars or commits per individual project.
Where the Rest of the Story Goes#
What does handle all of this: A dedicated developer bio that pulls live GitHub stars and commit counts per project, shows real-time MRR from connected payment gateways, and compiles to an ATS-readable PDF resume on demand. That's what goes in the devbio.me/yourname line at the end of most templates above.
No GitHub readme template closes those gaps on its own, because markdown has no live data layer to close them with. See what a profile looks like when the numbers update themselves.
Why a Screenshot Widget Isn't a Component#
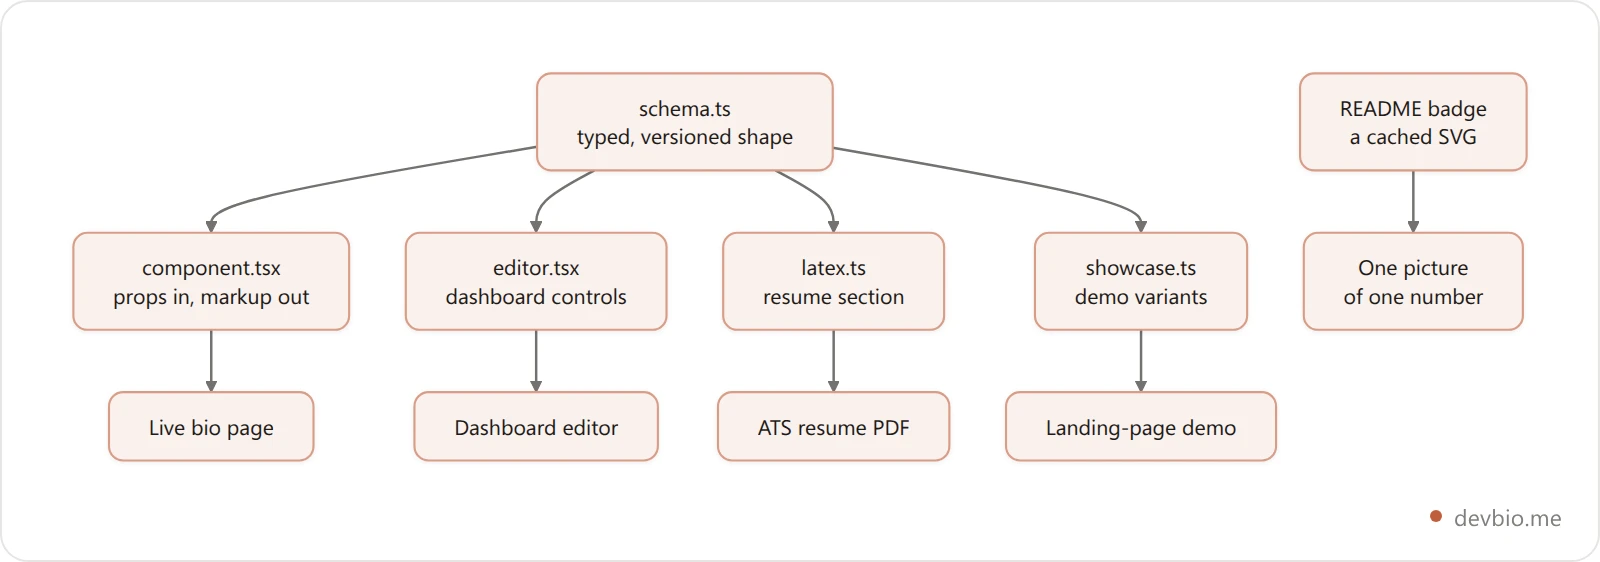
Every stats badge in the patterns above — the star count, the top-languages card — is a flat image. A service like github-readme-stats renders an SVG on request and GitHub caches it; the badge has no state, no schema, and nothing else on your profile knows it exists. Want that same star count on a resume PDF? You retype it by hand.
A DevBio bio component is structurally different, and it's worth being specific about why. It isn't a single React file — it's a folder of six pieces: a schema (the typed shape of the data, versioned so older profiles migrate forward instead of breaking on read), the component itself (props in, markup out, no fetching), a dashboard editor built for that exact component, a set of mock variants used on the public landing-page demo, and a converter that turns the same data into a resume section. One definition, three surfaces: your live bio page, the animated landing-page demo, and the dashboard editor all render the identical component from the identical schema. Update your skills list once and the resume PDF, the bio page, and the editor preview are all reading the same data — not three copies you maintain separately.
A Badge Is a Picture of a Number#
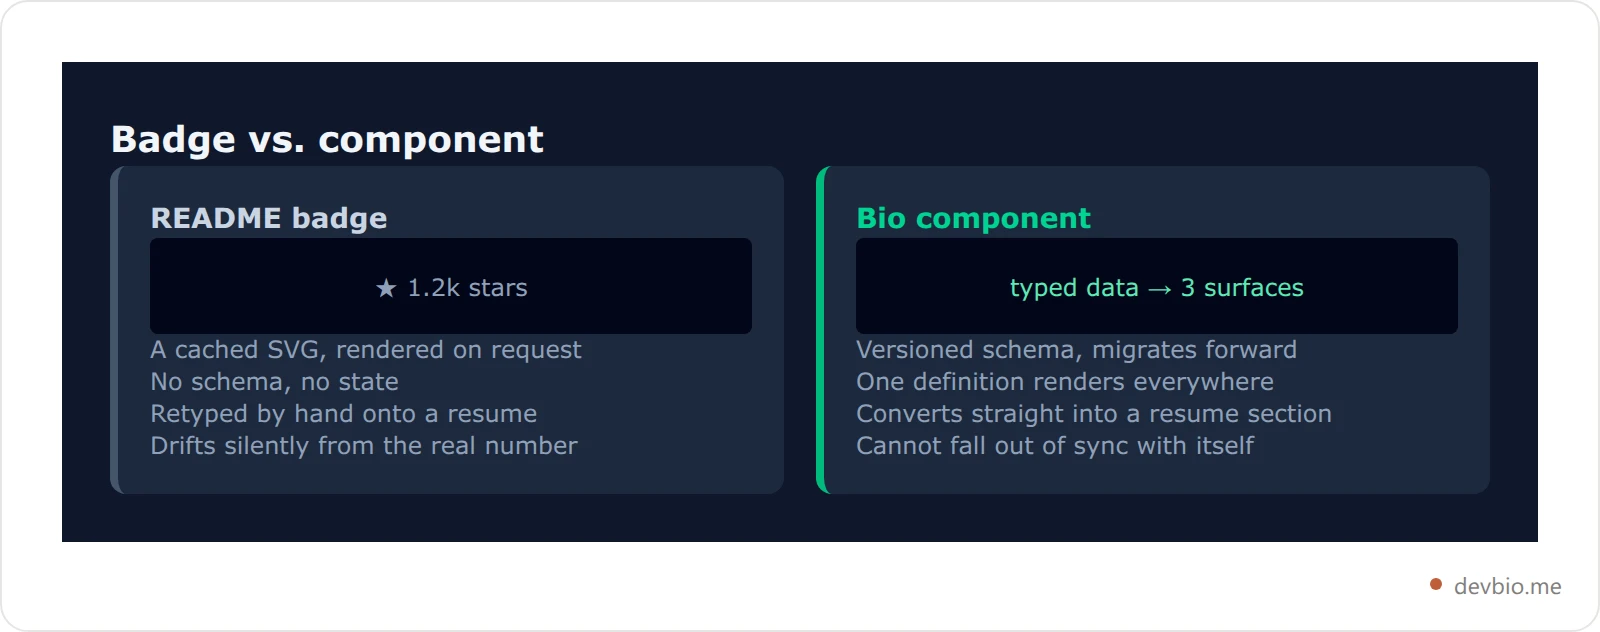
That's the real gap between a README badge and a bio component: a badge is a picture of a number. A component is typed data that renders everywhere it's used, including your resume, with nothing left to fall out of sync. It's a small architectural choice, but it's exactly why a stats widget in a README quietly drifts from whatever your resume PDF says — and why a bio component structurally can't.
For a full breakdown of what components to put on a developer bio to complement your README, that guide covers every building block. For a deeper look at how the GitHub contribution graph is calculated and what it actually counts, see the GitHub contribution heatmap guide. If you're still building your first README and want to understand what to include before worrying about pattern selection, start with the GitHub profile README guide.

Frequently Asked Questions#
What is a GitHub profile README?#
A GitHub profile README is a markdown file in a special repository named exactly after your GitHub username. It renders at the top of your public profile page, above your pinned repositories. GitHub added this feature in 2020. Any markdown content in that file — text, images, badges, stats widgets — appears as your profile's first impression. The repository must be public for the README to display.
How do I create a GitHub profile README?#
Create a new public repository with the exact same name as your GitHub username (e.g., github.com/yourname/yourname). Initialize it with a README.md. GitHub automatically recognizes this as a special profile repository and renders the README on your profile. If the repo is private or the name doesn't match your username exactly, the README won't show.
Which README pattern is best for getting hired?#
The Job Seeker pattern (Pattern 1). Lead with your title, stack, and open-to status in the first line. Pin 2–3 repos that demonstrate the skills required for your target role. End with one direct contact method. Don't bury your availability below a wall of stats widgets — recruiters scan profiles fast and most won't scroll.
Should I add GitHub stats widgets to my profile README?#
Depends on your pattern. The Full-Stack Generalist and OSS Maintainer profiles benefit from them. The Minimalist and Team Lead profiles look cluttered with them. The github-readme-stats widget (79.7k stars) counts only public contributions — if most of your work is in private repos, the numbers may underrepresent your actual activity. See the full breakdown in the GitHub README stats guide.
How long should a GitHub profile README be?#
Short enough that key information is visible without scrolling on most screens — roughly 3–5 concise sections. OSS Maintainer and DevRel profiles can run longer because the list of projects and content is the point. For most other patterns, one tight page beats three scrolling ones.
Can I use multiple patterns at the same time?#
Not cleanly. Blending patterns almost always produces a README that's too long and unclear about who it's for. Pick the pattern that matches your primary goal right now. You can update your README in five minutes when your goal shifts — that's the advantage of markdown over a static resume.
What do recruiters actually look for on a GitHub profile?#
Activity signals (recent commits, pinned repo quality, contribution graph), the quality of repository READMEs (does the project have a description, are issues handled, are there stars), and contact information. The 2025 GitHub Octoverse reports 180 million developers are on the platform — recruiters are scanning, not reading. Make your signal visible in under 10 seconds.
What should I put at the top of my GitHub profile README?#
Your name, your role or what you build, and your current status — open to work, building X, available for freelance. Everything after that supports those three signals. The most common mistake is opening with a decorative banner or a generic "Hi there 👋" greeting. You've lost the reader in the first second.
Key Takeaways#
A GitHub profile README is a 10-second signal, not a biography. The difference between a profile that gets noticed and one that gets skipped isn't the template — it's matching the pattern to your actual goal and your actual audience.
Three things to take from this:
Pick one pattern. Trying to appeal to everyone results in appealing to no one. Commit to the pattern that fits your goal right now — you can switch in five minutes when the goal changes.
Lead with your strongest signal. Your role and status in the header, your best evidence in the first scroll.
End with one CTA. Every template above ends with one link. Not five.
When your README is working, its job is to hand off to something with more depth — a portfolio, a resume, or a developer bio that shows the work your GitHub profile can't. Your code already proves you can build. Put it all on one link — devbio.me.


