

Open a popular GitHub profile and you'll see them before anything else: a row of colorful rectangles showing "TypeScript", "React", "PostgreSQL", "Kubernetes", "AWS" — sometimes 30 deep. GitHub tech stack badges are everywhere.
The problem is anyone can paste them in. Adding a React badge to your README takes 30 seconds and requires exactly zero lines of React code. A badge says "I know Go" the same way a resume bullet says "proficient in Go" — it's a claim, not evidence. Senior technical hiring managers figured this out years ago. One engineering director at a growth-stage startup put it plainly: "I skip past the badge row entirely. I want to see what you actually built."
This guide covers the full mechanics of GitHub tech stack badges — Shields.io, Simple Icons, layout, order, maintenance — and explains exactly where static badges stop earning you credibility, and what to stack on top of them.
GitHub tech stack badges are SVG images embedded in a README using standard Markdown image syntax. They display a technology name, a brand logo, and a color — all static, all self-reported, visible at a glance. The two core services powering them are Shields.io (the badge generation API) and Simple Icons (the brand icon library). Neither knows whether you've written a single line of code in the technology on the badge.
What Are GitHub Tech Stack Badges?#
GitHub tech stack badges are small SVG images that embed in a README to display a technology name and brand logo. They are defined as static, manually created image links — not connected to your repositories, your commit history, or any code you have actually written.
Most readme badges you see in the wild come from the same two services:
Shields.io — the dominant badge generation API. It serves billions of requests a month, generating "label | message" badges in any color, style, and shape.
Simple Icons — a community-maintained library of 3,100+ brand SVG icons covering React, TypeScript, Rust, AWS, Vercel, Supabase, and thousands more. Shields.io references it via the
logo=parameter.
The combination is powerful for visual communication. It's also completely decoupled from proof. That's the core tension this guide resolves.
On this page
How to Create GitHub Tech Stack Badges with Shields.io#
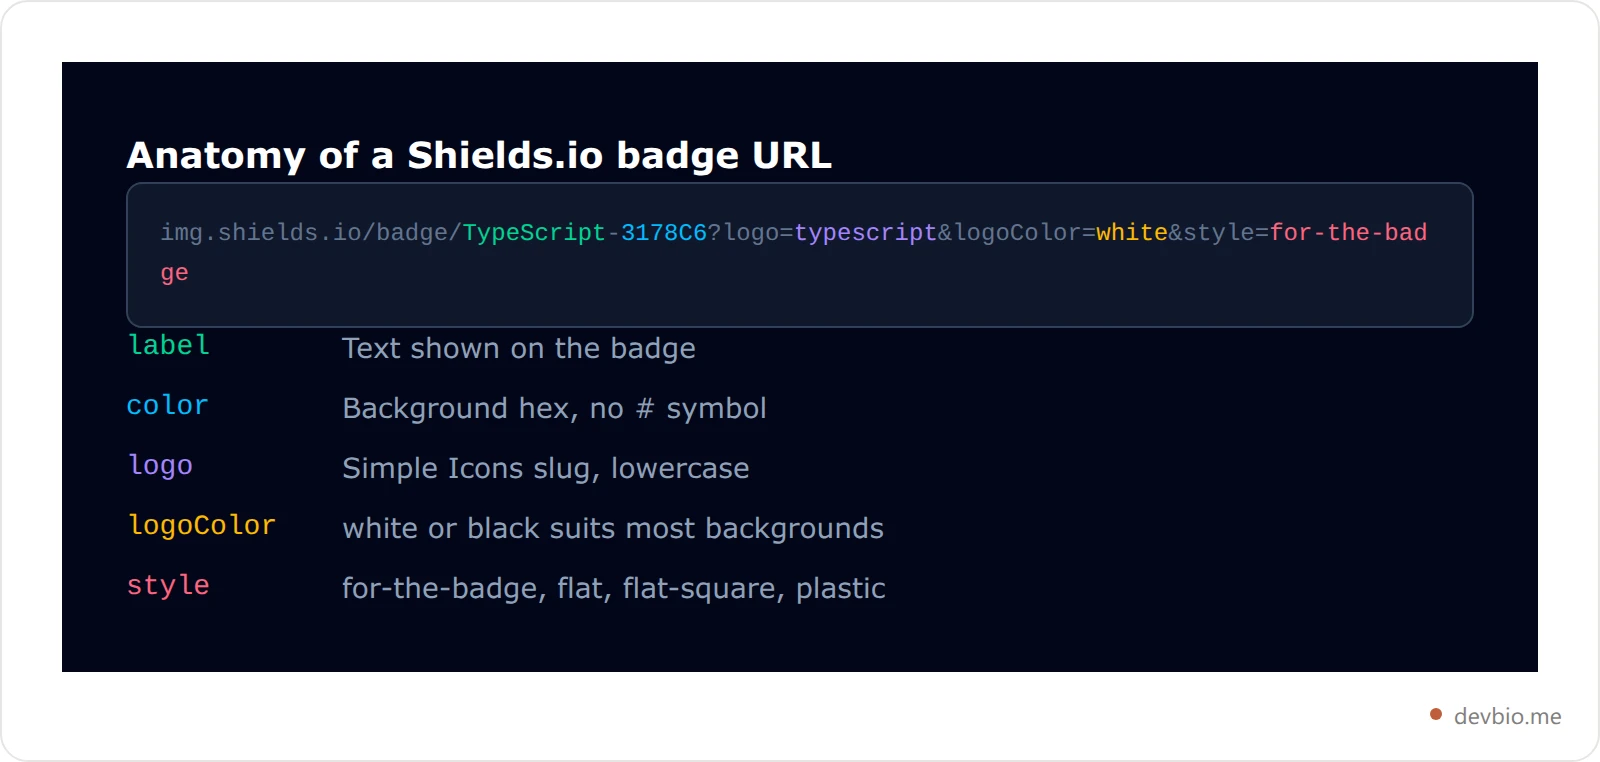
The Shields.io badge URL follows a consistent structure:
https://img.shields.io/badge/<label>-<color>?logo=<slug>&logoColor=<hex>&style=<style>Key parameters:
label— the technology name displayed on the badge (TypeScript,React,Go)color— background hex without the#symbol (3178C6for TypeScript,61DAFBfor React)logo— the Simple Icons slug in lowercase (typescript,react,go,node.js). Find slugs at simpleicons.orglogoColor— icon color;whiteorblackworks for most backgroundsstyle—for-the-badge(taller, strong visual weight),flat(compact, subtle),flat-square, orplastic
Finding official brand colors: every entry on simpleicons.org lists the exact hex. Using official colors reads as intentional. Generic gray does not.
Four common badges, copy-ready:



Paste them consecutively on the same line in your README.md — no commas, no HTML wrappers. GitHub renders them inline with natural line-wrapping on mobile.
Rather than assembling those URLs by hand, pick your stack in the free tech badge generator and copy the finished Markdown row.
One note on performance: Shields.io fetches the Simple Icons SVG on demand. The first render after an icon update can be slow; subsequent renders are cached. If you need complete control over badge appearance offline, use the logo=data:image/svg+xml;base64,... parameter with a base64-encoded SVG instead.
Organizing Your Tech Stack Badges#
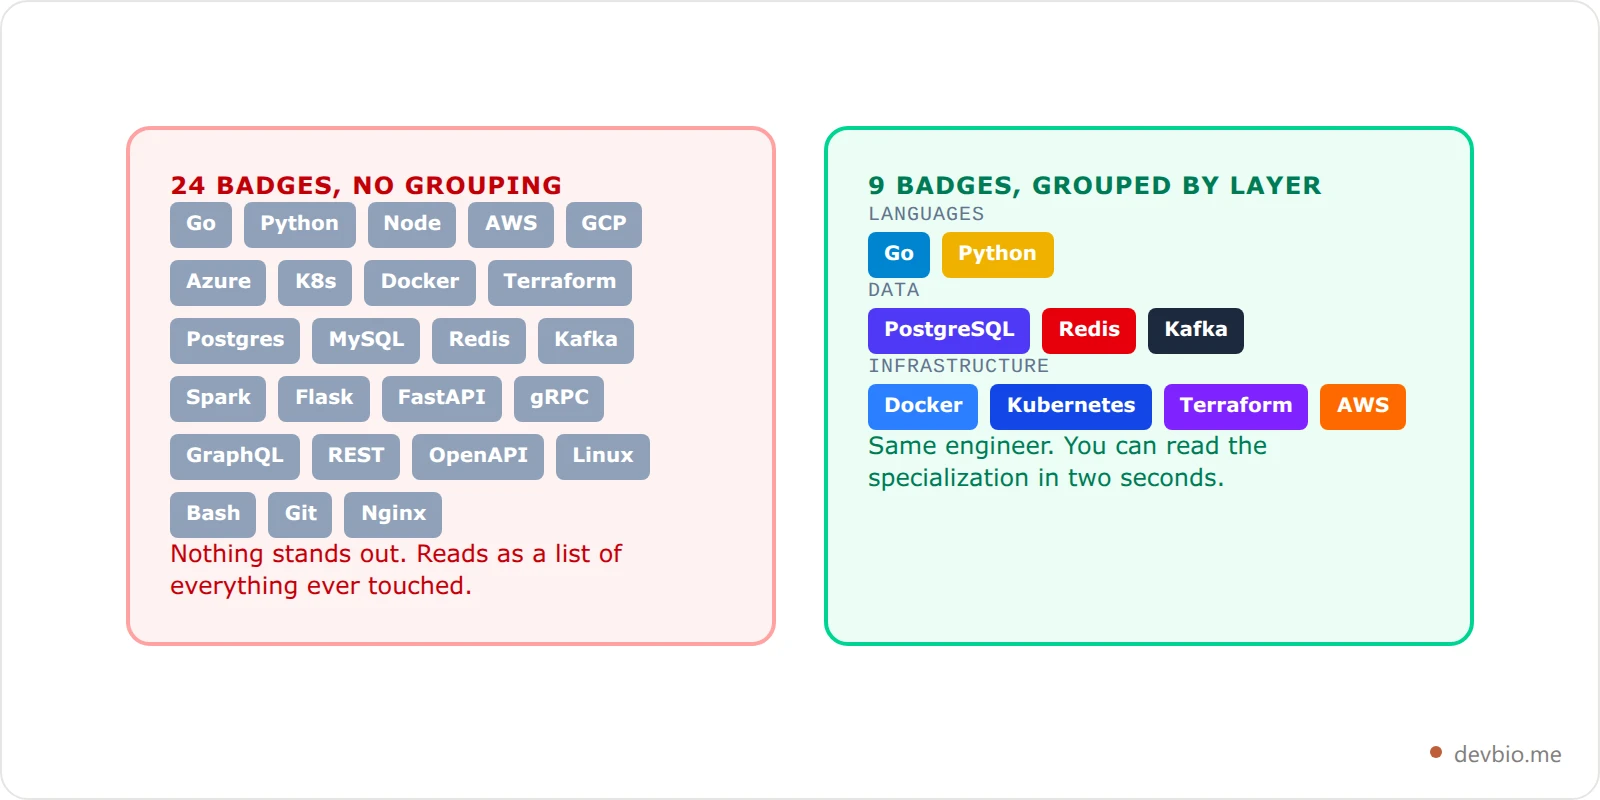
Randomly ordered badges are as unreadable as an unsorted list. Three ways to structure the badge block on a tech stack profile that actually work:
By layer (recommended for full-stack developers):
<!-- Languages -->
![TypeScript] ![Python] ![Go]

<!-- Frameworks & Libraries -->
![React] ![FastAPI] ![gRPC]

<!-- Infrastructure & Tools -->
![PostgreSQL] ![Docker] ![AWS]
HTML comments like <!-- Languages --> are invisible on the rendered GitHub page but visible in raw markdown — they give you visual grouping without injecting <h3> headers into the badge section. Worth knowing that GitHub only renders a fixed allowlist of HTML tags inside Markdown, which is the same reason there's no underline in Markdown unless you pick a tag that survives sanitization — bold text is the one exception in that family, since **bold** is real Markdown syntax and never touches the sanitizer at all.
By primary role (for specialists): Lead with your main language and its ecosystem. A Go backend developer who also writes occasional Python should not lead with Python badges just because they have more Python repos from an older job. Lead with what you want to be hired to do.
By recency (for career changers): If you moved from Java to Rust two years ago, Rust goes first. Stale-first ordering reads as stale thinking.
The hard limit: 12 badges maximum. Visual scanning breaks past 12. If you have 20+ technologies you want to show, you have a prioritization problem, not a display problem. Fix the prioritization — put the rest in a "also familiar with" section or drop them entirely.
5 Common GitHub Badge Mistakes (and How to Fix Them)#
1. Badge overload. 30 badges is an anti-pattern. It signals that you don't know your own stack, because real specialists know exactly what they reach for first. Cut to the 8–12 tools you use on every project and remove the rest.
2. Wrong or generic colors. Any badge generator will hand you a default, and defaults are where this goes wrong. Badges are also the only dependable way to get color into a README at all — Markdown has no color text syntax, so the hex you set here is doing work no markup can. A gray badge with no logo, or a React badge in purple instead of #61DAFB, reads as copy-pasted without care. Spend 60 seconds on simpleicons.org per badge to find the official hex. The visual consistency compounds — a well-colored badge row looks deliberate; a mismatched one looks cobbled.
3. A stale stack. Left "Ruby on Rails" from 2019 in your README while you've shipped three Go services in the past two years? Recruiters look at the language breakdown in your actual repos. A mismatch between your badges and your real commit activity reads as either inattention or deception. Review your badge row every time you start a new role or project.
4. No organizational structure. One undifferentiated wall of 20 badges — no grouping, no hierarchy — tells a viewer nothing about how your stack fits together. Group by layer (languages, frameworks, tools) with HTML comment separators. Use consistent style (for-the-badge throughout, not mixed styles).
5. Badges with nothing behind them. This is the most expensive mistake. A polished badge row where there are no pinned repos, no public stars, and no recent commits is pure noise. Badges only work when there's activity and shipped work behind them. Without that, they make you look like you're compensating.
The Problem with Static Badges#
In 2024, Python overtook JavaScript as the most-used language on GitHub — the first time in GitHub's recorded history, according to the GitHub Octoverse 2024 report. Within weeks, profiles across the platform added Python badges. None of those badges told you anything about whether the owner had shipped a single production Python service.
That gap reveals three structural problems with static badges:
They're self-reported. Anyone can claim any technology. There's no signal distinguishing 200,000 lines of production TypeScript from one tutorial and a badge. The barrier to adding a badge is 30 seconds — which means the signal-to-noise ratio is inherently low.
They don't update with your actual stack. If you stopped using MySQL two years ago and switched to PostgreSQL, your badges still say "MySQL" unless you manually update them. Nobody updates consistently. Stale badges — AWS when you've been on GCP, Angular when you moved to Vue — read as inattention to detail on the most visible part of your GitHub presence.
They're invisible to ATS systems. Applicant tracking systems parse text, not images. Every tech stack badge is an <img> tag that ATS scanners skip entirely. The skills inside your badges never reach the ATS keyword index. If you're applying for jobs through any kind of automated screening, you need a text-based skills section somewhere that ATS can actually read — badges alone won't get you through.
According to the Stack Overflow Developer Survey 2024, 62.3% of developers use JavaScript, while Python has surged to become the most-wanted language for the sixth consecutive year. These are the tools developers want to show off — but showing a JavaScript badge and actually demonstrating JavaScript proficiency through shipped projects are two very different things.
The Proof Pyramid for Developer Skills#
Here's a model for thinking about how you demonstrate technical competence, ordered from weakest to strongest evidence. Call it the Proof Pyramid:
Level 1 — Text claims. "Proficient in React" on a resume or LinkedIn. Zero cost to write, zero friction to inflate. ATS-readable, but essentially unfalsifiable. Every candidate has these. Nobody distinguishes on them.
Level 2 — Static badges. Shields.io in your GitHub README. Still self-reported. More visual than plain text and faster to scan, but they carry no connection to actual code. The barrier to adding a badge is 30 seconds, which puts the signal-to-noise ratio near the floor.
Level 3 — Activity signals. Your GitHub contribution graph, public repo stars, commit history, and language breakdown. Real data from real activity — much harder to fabricate at scale. The GitHub contribution heatmap is the most visible Level 3 signal: it shows that you write code consistently, even if it doesn't reveal what you shipped. That distinction matters.
Level 4 — Shipped proof. A project card showing 340 GitHub stars, 1,200 commits tracked over 18 months, and $420/month verified MRR from Stripe. That is a complete argument for your technical credibility in a single glance. It answers the three questions any technical hiring manager or potential collaborator actually has: Can you build something? Does it work? Do people use it?
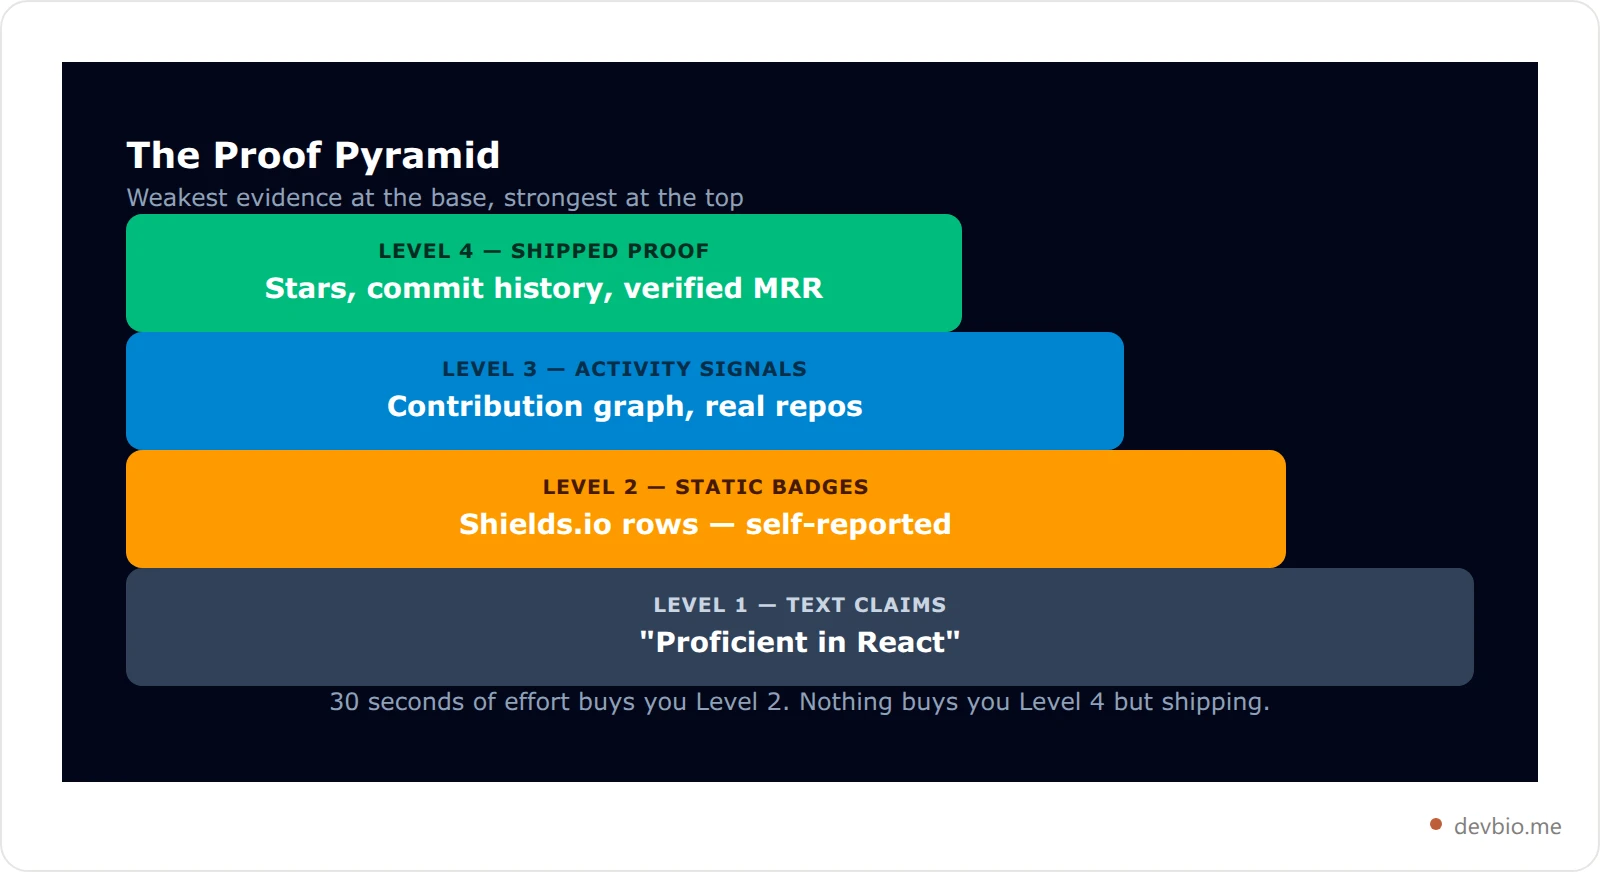
Most developer profiles live at Level 1–2. The developers who consistently get recruiter inbound, attract co-founder conversations, or win freelance clients on their profile alone are operating at Level 3–4.
Badges are Level 2. Use them for the fast visual scan in a README. Don't let them be the ceiling.
A Before/After: Same Developer, Two Profiles#
Here's how the profile evolution typically looks for a mid-career backend engineer. Call him Marcus.
Before: Marcus's GitHub README has 24 badges — Go, Python, Node.js, AWS, GCP, Azure, Kubernetes, Docker, Terraform, PostgreSQL, MySQL, Redis, Kafka, Spark, Flask, FastAPI, gRPC, GraphQL, REST, OpenAPI, Linux, Bash, Git, Nginx. His pinned repos are 4 years old with 0–2 stars each. His contribution graph shows modest, irregular activity. His profile gets views but zero recruiter messages.
After: Marcus trims to 9 badges — Go, Python, PostgreSQL, Docker, Kubernetes, Terraform, AWS, Redis, Kafka — organized in two groups with HTML comment separators. He builds a DevBio profile at devbio.me/marcus with two project cards linked to their GitHub repos: a Kafka consumer framework that's accumulated 187 stars and 520 commits over 8 months, and an open-source Terraform module with 94 stars and weekly active commits. He connects his Stripe account; the consulting retainer he's running shows as $1,800/month verified revenue on the project card.
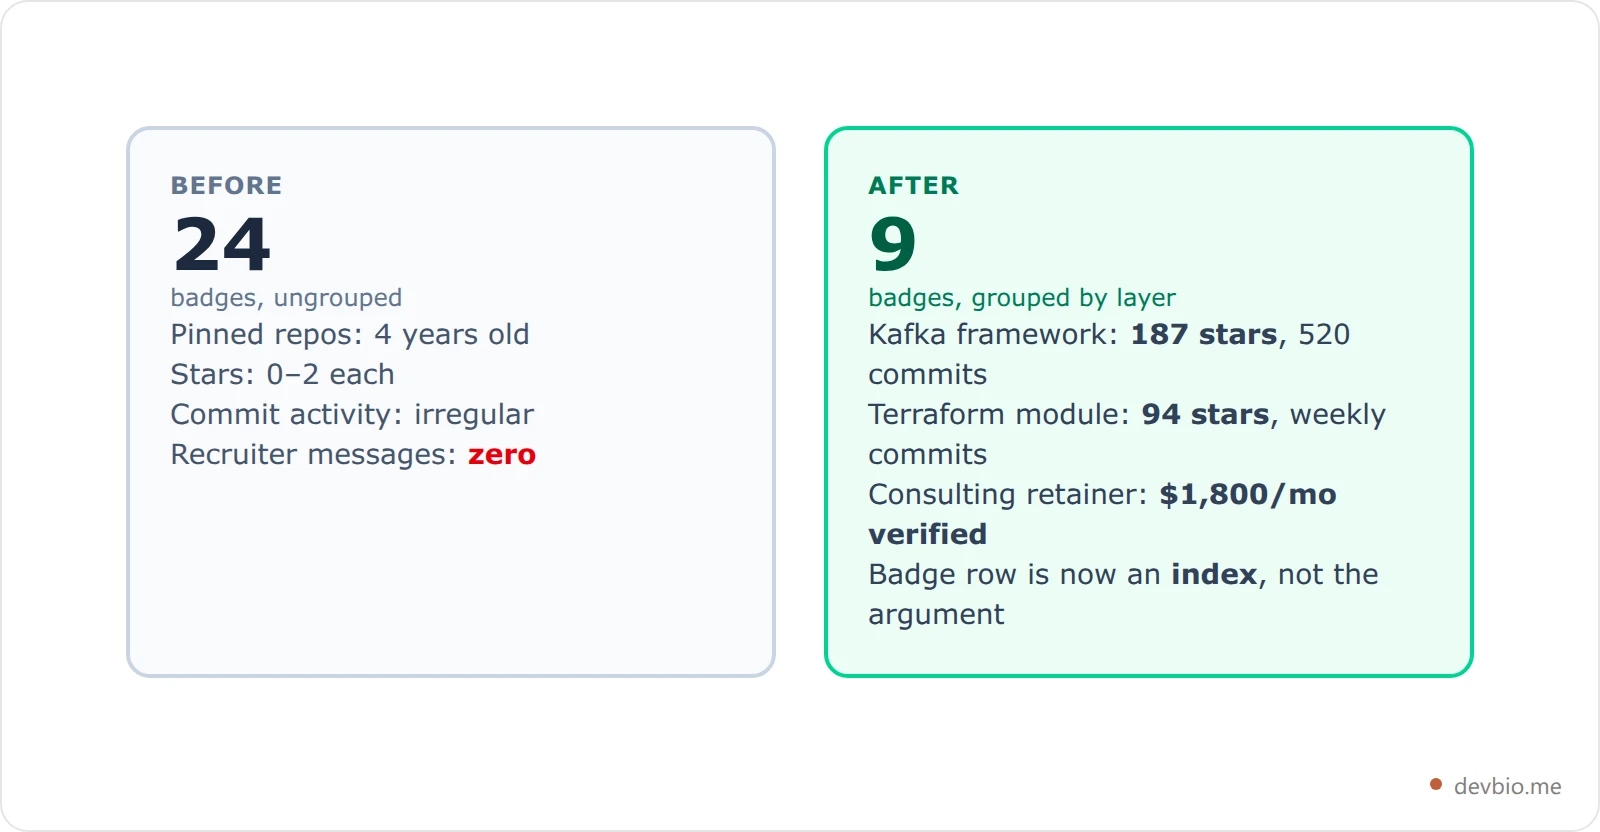
Same skills. Two completely different credibility signals.
The difference isn't the number of badges or which technologies are on them. The difference is the presence of real Level 3 and Level 4 evidence behind them. The badge row is now an index; the projects are the argument.
For a broader look at how GitHub profiles, personal sites, and developer bios compare across different scenarios, see the developer portfolio comparison — it covers when each format wins and why.
Put real data behind the badge row
A devbio page pulls live stars, commit activity, and primary language straight from the GitHub API — so your stack claims arrive with evidence attached.
Claim your handleSkills Display: GitHub Badges vs Other Approaches#
The right tool depends on what you're trying to communicate and to whom. Here's how the main methods stack up:
Method | Self-reported? | ATS-readable? | Auto-updates? | Shows shipped work? | Time to set up |
|---|---|---|---|---|---|
Shields.io badges in README | Yes | No | No | No | 2 min/badge |
GitHub language stats card | Partial | No | Yes | No | 5 min |
Plain text skills list | Yes | Yes | No | No | 2 min total |
Skills component (pills) on a dev bio | Yes | Varies | No | No | 5 min total |
Project card with live GitHub data | No — pulled live | Varies | Yes (synced) | Yes | ~10 min/project |
Project card with live MRR | No — pulled live | Varies | Yes (synced) | Yes + revenue | ~10 min/project |
The progression here isn't about replacing badges. It's about understanding the ceiling of each method. Badges are a fast visual scan — they're correct for that job. The gap opens between Level 2 (badges, static) and Level 4 (project cards with live data), and that's where most developer profiles leave real credibility on the table.
For a deep look at how GitHub README stats cards work differently from badges — and what they miss — the GitHub README stats guide covers the full breakdown.
Building Your Full Developer Presence in 2026#
Tech stack badges, stats, and a consolidated developer profile are three distinct layers. Developers who get the most from their online presence treat them as a stack — not substitutes for each other.
Layer 1 — Your GitHub profile README. This is your activity home. Badges go here — 8–12, curated, grouped, consistent style. Pair them with 2–3 pinned repos that have recent commits and clear READMEs. Your contribution graph tells its own story at Layer 3. The GitHub Profile README guide covers what to include, what to skip, and when your README alone isn't enough.
Layer 2 — Individual project READMEs. Each repo deserves its own badge row as tech stack documentation — for contributors, for users scanning the repo, for anyone evaluating whether the project uses their stack. This is where flat style badges make the most sense, sitting inline with text.
Layer 3 — Your developer bio. A single shareable URL that pulls GitHub stats, your skills, live project data, and your resume together. This is what you send to a recruiter, paste in a cold outreach email, or link from your Twitter/X bio. Your GitHub profile is for people already on GitHub; your developer bio is for everyone else. Set one up in a few minutes and point your badge row at it.
On a DevBio profile, the skills component renders your stack as animated pills — you can label the section "Skills", "Stack", or "Tech", add up to 80 items, and arrange them however makes sense for your specialization. The bigger unlock is on the projects side: each project card can be connected to its GitHub repo, and the card then surfaces live stars, weekly commit activity, and primary language pulled directly from the GitHub API at render time. That puts your badge claims in front of real, verified evidence rather than standing alone.
For patterns that work across all three layers, the GitHub profile README templates post has 10 copyable README structures organized by goal — job search, open source, freelancing, building in public — each designed to connect naturally to a full developer bio.
Frequently Asked Questions#
What is the difference between Shields.io badges and GitHub README stats cards?#
Shields.io badges are static, manually created image links that display whatever label and color you specify — they carry no data from your repositories. GitHub stats cards (typically from github-readme-stats) pull aggregate data from the GitHub API: total commits, PR counts, and your language distribution by bytes across public repos. Stats cards reflect real activity; badges reflect self-reporting. For a full comparison of what stats cards show and what they miss, see the GitHub README stats guide.
How do I find the correct Simple Icons slug for a technology?#
Go to simpleicons.org and search the technology name. The slug appears below each icon — it is the name in lowercase with spaces replaced by hyphens. "Node.js" becomes node.js. "Visual Studio Code" becomes visualstudiocode. "Amazon Web Services" becomes amazonwebservices. If a brand is not on Simple Icons yet, you can use logo=data:image/svg+xml;base64,... with a base64-encoded SVG as a fallback.
Should I use for-the-badge or flat style on my GitHub profile?#
Use for-the-badge on your GitHub profile README — it is taller, reads well at a glance, and gives the badge section visual weight. Use flat on project READMEs where badges appear alongside text explanations and you want them to stay compact. The most important rule is consistency: pick one style per page and stick to it.
Are GitHub tech stack badges visible to ATS systems?#
No. ATS parsers read text; SVG images are skipped entirely. Every tech stack badge is an <img> tag that applicant tracking systems cannot index. If you are applying for jobs through any automated screening pipeline, add your skills in plain text — either in your resume's skills section or on a profile platform that generates an ATS-compatible text PDF. Badges alone will not get your skills past automated keyword matching.
How many GitHub tech stack badges should I include?#
6–12 is the practical range for a profile README. Fewer than 6 looks thin. More than 12 creates noise where nothing stands out. The right number is however many you can justify with real repository activity — if you have 15 badges and 8 of them represent technologies you haven't touched in 2 years, drop the 8.
Can I automate my GitHub tech stack badges to stay current?#
Not natively — Shields.io badges are static by design. Some developers write GitHub Actions workflows that query the GitHub API for their top languages and regenerate their README on a schedule. The simpler alternative is a developer profile that pulls language data from the GitHub API automatically, so it is always current without any maintenance script.
Do tech stack badges affect my GitHub contribution graph?#
Only incidentally. Adding or editing badges is a regular commit, which adds a single contribution square to your graph on that day. Beyond that commit, badge maintenance has zero effect on your contribution graph. If you want your graph to show consistent activity, you need consistent code commits — badges won't get you there.
What should I do if most of my work is in private repos?#
Private repo commits don't appear on the public contribution graph, and private repos can't feed live data into public project cards. Your options: contribute to open source projects in your stack to build a public record; open-source a tool, library, or starter template from your private work; or note explicitly on your profile that your primary work is under NDA and emphasize your skills section alongside any public revenue figures or client outcomes you can share. Being honest about private work is better than a sparse public graph with no explanation.
Key Takeaways#
GitHub tech stack badges are a Level 2 signal on the Proof Pyramid — a necessary visual shorthand that tells visitors what tools you work with. Use them: 8–12 curated badges, official brand colors from simpleicons.org, grouped by layer with HTML comment separators, in for-the-badge style on your profile and flat on project READMEs.
Then push to Level 3 and 4. Pin repos with recent commits. Open-source something with actual users and track its GitHub stars. If you have revenue from a shipped product, put it on the record where it can be seen — the building in public guide covers exactly how to set up live data proof. The developer who shows up with a clean badge row, active project cards showing 200 real stars, and verified MRR outcompetes the one with 30 badges and four dead repos — every time.
Static badges say what you know. Shipped projects with live data prove it. The goal is to have both, with the live data doing the heavy lifting.
Your code already proves you can build. Put it all on one link — devbio.me.


