

GitHub gists come with a privacy myth built into how people talk about them: secret gists aren't private. GitHub's own docs say so: send a secret gist's URL to a friend and they can see it; if a stranger finds that URL, so can they. A lot of developers treat "secret" as a synonym for "private" — and paste things they shouldn't.
A GitHub gist is a single- or multi-file code snippet that lives as its own small Git repository — you can clone it, fork it, star it, and track its full revision history, but without the setup of a real project. You get two visibility levels, public and secret, and you can pin gists to your profile.
This guide covers how gists actually work, how to embed one outside a README, and when a repo is the better call.
What Is a GitHub Gist, Exactly?#
GitHub gists exist for one job: sharing a snippet without the overhead of a repo. Under the hood, a gist is a Git repository like any other — GitHub just strips away the parts a snippet doesn't need. There's no branch protection, no issues tab, no pull requests. What you keep: full commit history with diffs, the ability to clone it with git clone, and forking, so someone else can build on your snippet without touching your original.
A quick example: say you're answering a question in a developer Discord and want to share fifteen lines of working code. Pasting fifteen lines into a chat window is ugly and impossible to update later. Opening a full repo for it is overkill — nobody's going to clone fifteen lines. A gist is built for exactly that middle ground: paste it once, get a clean shareable link, and edit it later if you find a bug.
GitHub gists are good for things that don't deserve a full repo: a config file you keep pasting into Slack, a one-off script, a code sample for a Stack Overflow answer, a .gitconfig you want to share. If it's going to grow past a handful of files or need a README of its own, it's not a gist problem anymore — it's a repo.
Gists and Git: Why There's No git gist Command#
Plenty of people search for "git gist," and it's a reasonable guess — every gist really is a Git repository. But gist isn't a Git subcommand, and running it just gets you a shrug:
$ git gist
git: 'gist' is not a git command. See 'git --help'.
What does work is treating a gist like any other remote. Each one has a clone URL — the gist's own address with .git on the end, shown on the gist page — so ordinary Git applies end to end:
# Copy the clone URL from the gist page, then:
git clone <GIST_CLONE_URL>
cd GIST_ID
git commit -am "Fix the off-by-one"
git push
Push a commit and the gist's revision history updates exactly like a repo's, diffs included. That's the whole reason a gist can show you a full history for a fifteen-line file.
Creating gists from the terminal is the one part Git itself can't do — that lives in GitHub's CLI:
gh gist create snippet.py
gh gist create snippet.py --public
gh gist list
Watch the default: gh gist create makes a secret gist unless you pass --public. That trips people the opposite way from the privacy myth above — they assume they published something, and it never showed up in Discover because it was secret all along.
Public vs. Secret: What "Private" Actually Means#
GitHub gives you two visibility options, and neither one is "private" in the way a private repo is — the public vs secret gist choice affects discoverability, not protection.
Public gists show up on the Discover page and in Gist Search — anyone can browse or search for them, no login required.
Secret gists don't show up in Discover and aren't searchable. But GitHub's own documentation is explicit about what that does and doesn't mean: "Secret gists aren't private. If you send the URL of a secret gist to a friend, they'll be able to see it. However, if someone you don't know discovers the URL, they'll also be able to see your gist." The URL being long and unguessable is the entire protection. It's the same category error people make with a markdown comment: hard to stumble across is not the same as impossible to read.
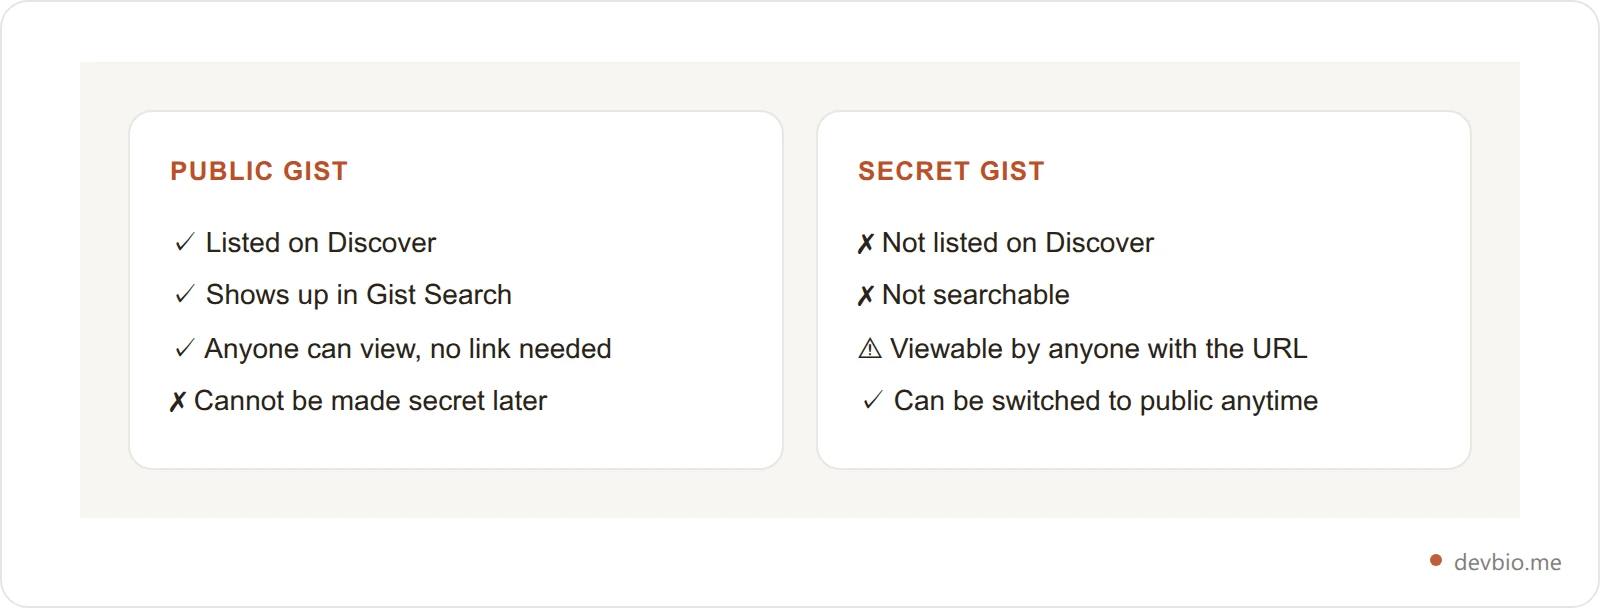
One more asymmetry worth knowing: you can switch a secret gist to public, but you can't switch a public gist back to secret. Once it's public, it's public — deleting it is your only way back.
How to Create a Gist#
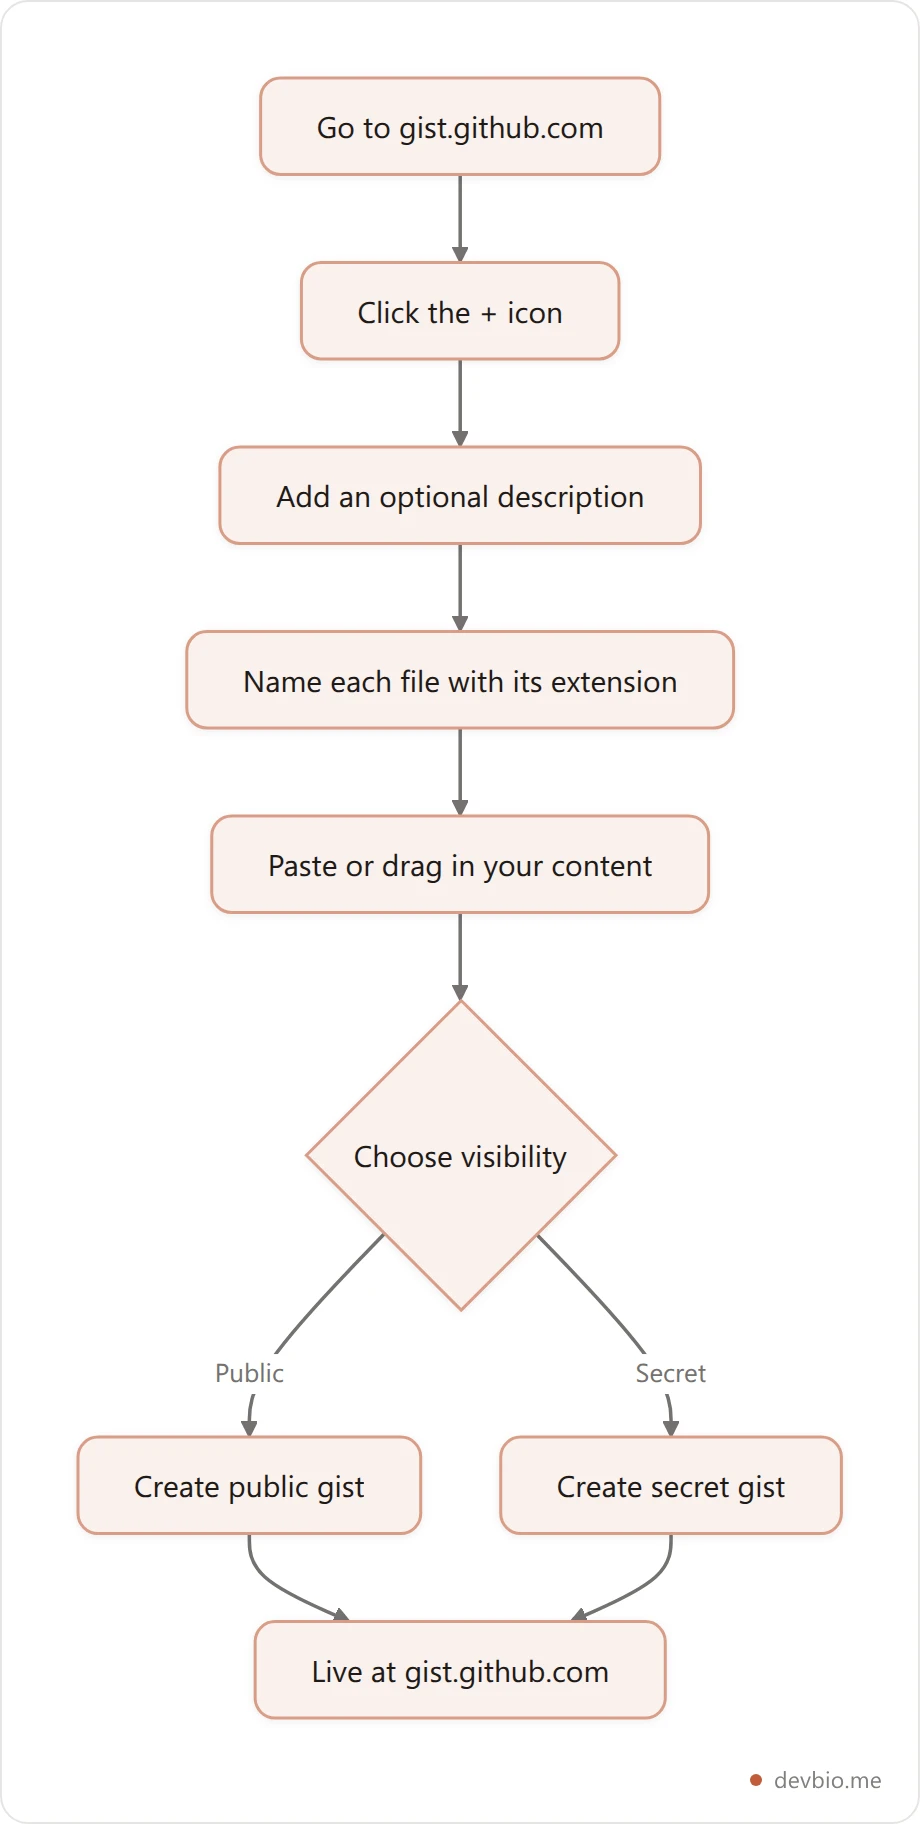
Creating one takes under a minute (see GitHub's own walkthrough for the full docs):
Sign in to GitHub and go to your gist home page.
Click the + icon, or "Create gist."
Add an optional description — this becomes the title people see in Discover and search.
Name each file, including its extension (
.py,.md,.json) — GitHub uses the extension for syntax highlighting.Paste or type your content, or drag a file straight from your desktop into the editor.
Choose Create public gist or Create secret gist.
Click create.
You can add more files to the same gist later, and every edit is tracked — click into a gist's revision history to see the diff between any two versions, the same way you'd review commits on a repo.
How to Embed a Gist in a Blog, Site, or README#
To embed a GitHub gist anywhere outside GitHub itself, start with its Embed URL — click the clipboard icon next to it to copy a <script> tag that renders the gist, syntax-highlighted, wherever you paste it. Want just one file from a multi-file gist? Add ?file=filename.py to the embed URL and only that file shows.
Here's the part that trips people up: that embed is JavaScript, and GitHub strips <script> tags out of rendered Markdown for security. Paste a gist embed into a README and nothing shows up — READMEs don't execute JS. The embed works on your personal blog, a static site, or any page that runs its own JavaScript. It does not work inside GitHub's Markdown preview.
For a README, you've got three real options:
Link straight to the gist
Paste the relevant lines as a fenced code block, and link to the gist for history and the rest of the file
Treat the gist as supporting material and point to it from somewhere that can run the embed — a blog post, a portfolio page, or a bio page
For more on what actually belongs in the README itself, versus what should live elsewhere, see what to include in a GitHub profile README.
Gist or Repo? When to Use Which#
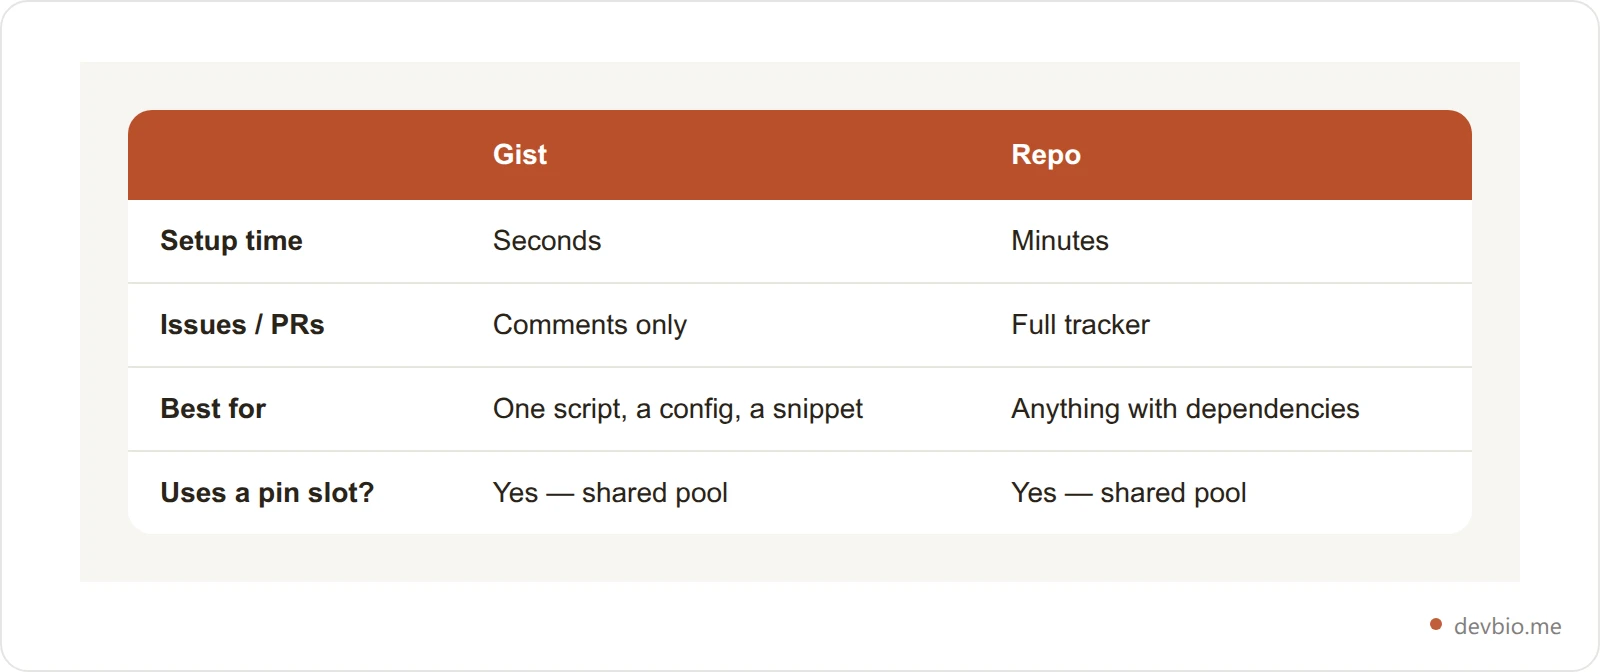
Both are Git repositories under the hood, so the GitHub gist vs repo decision comes down to scope, not capability — use whichever fits. Here's a faster test if the line still isn't obvious: if you'd be embarrassed to clone it and find just one file with no context, it's a gist. If someone would reasonably open an issue asking "why doesn't this work on Windows," it's a repo.
Can You Pin a Gist to Your Profile?#
Yes. You can pin a gist to your profile from the gist's own page — which is easy to miss, because the button isn't in the same "Customize your pins" screen you'd use for repos.
This matters because of a limit most guides on pinned repos leave out: your profile's six pin slots are shared between repos and gists, not six of each. Pin four repos and two gists, and you're full. For the full breakdown of the six-slot cap — including why a repo you've only contributed to can never be pinned — see our pinned repositories guide.
Pinning a gist makes sense when the gist itself is the achievement — a widely-forked snippet, a reference implementation, something with its own following. If it's just supporting material for a project, pin the project instead and let the gist stay linked from inside it.
Finding and Organizing Your Gists#
Your gists don't live on your profile the way repos do — there's no "Gists" tab next to Repositories. To see them, go to your gist home page and click All Gists, sorted by when you created or last updated them.
To find GitHub gists by topic instead of by author, Gist Search lets you filter by programming language. It only searches public gists — secret ones stay out of results even for gists a visitor could technically open by URL.
There's no tagging system either — descriptions are the only metadata you get, which is exactly why vague ones become a problem months later. A quick maintenance habit worth adopting: since you can edit a gist's description any time, renaming anything still titled "test" or "untitled" is a five-minute cleanup that actually pays off.
Where a Gist Fits Into Your Bigger Profile#
A gist proves you can write a clean, self-contained snippet. It doesn't show anyone your GitHub stats, your work history, or that the project attached to that snippet has actual users. That context has to live somewhere a gist can't provide it.
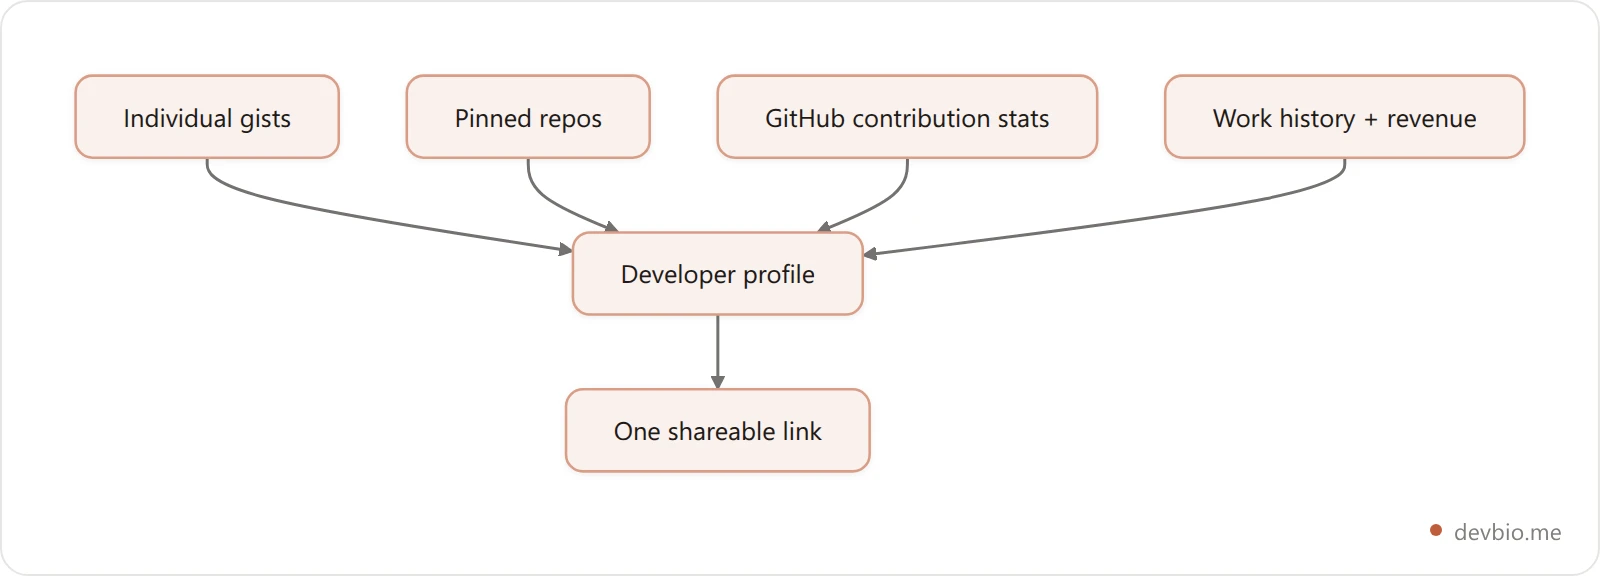
This is the gap a devbio profile is built to close: it pulls your GitHub stats and contribution activity automatically — refreshed every six hours — and puts them next to the project write-ups, work history, and, if you connect a payment processor, real revenue numbers that a gist, or even a full README, was never designed to hold. A gist is still the right tool for the snippet itself. It's just not the whole story.
For more on this gap specifically, see Open Source Portfolio: Show Your GitHub Impact Beyond the README.
Your gists are scattered. Your profile doesn't have to be.
Connect GitHub once and devbio keeps your stats, pinned work, and side projects in one link — free to start.
Build your bioFrequently Asked Questions#
Are GitHub gists really free?#
Yes. Gists have always been a free GitHub feature — no paid tier, and no login required just to view a public one. The only gist-related constraint that matters is the shared six-slot cap on profile pins; creating gists themselves costs nothing.
Can I convert a secret gist to public, or back?#
One-way only. GitHub lets you switch a secret gist to public whenever you want, but not the reverse — once a gist is public, it stays public. If you need sensitive content gone, deleting the gist is the real fix; anyone who already cloned or forked it keeps their copy regardless.
Do gist embeds work inside a GitHub README?#
No. The gist embed is a JavaScript <script> tag, and GitHub strips scripts out of rendered Markdown for security — READMEs never execute it. The embed works on pages that run their own JavaScript, like a blog or a personal site. In a README, link to the gist or paste the code as a fenced block instead.
Can I pin a gist alongside my pinned repos?#
Yes, from the gist's own page. But they share one pool: your profile's six pin slots cover repos and gists combined, not six of each. Pin four repos and two gists and every slot is used — there's no separate quota just for gists.
Is there a git gist command?#
No. gist isn't a Git subcommand, so Git reports it as unknown. Gists are Git repositories, so you clone, commit, and push them with ordinary Git once one exists — but creating one from the terminal needs GitHub's CLI: gh gist create file.py, which makes a secret gist unless you add --public.
What happens to forks if I delete my original gist?#
Nothing. Every gist is its own Git repository, so a fork becomes an independent copy the instant someone creates it. Deleting your original doesn't remove anyone's fork, and doesn't undo clones people already pulled — those copies exist on their own from that point forward.
Key Takeaways#
A GitHub gist is a snippet with Git behind it: two visibility levels (neither one truly private), full version history, and the ability to fork, star, and pin it. Use a gist for something genuinely small — a script, a config, an answer to a question. The moment it needs a README of its own, move it to a repo.
Embeds are JavaScript, so they render on a blog or personal site but not inside a GitHub README — link or paste code there instead. And if you're pinning gists, remember they're drawing from the same six slots as your repos.
None of that adds up to a full picture of what you've built, though — a gist shows a snippet, not the project, the stats, or the work behind it. Build your bio and give the rest of it somewhere to live.


